Showing posts with label diy. Show all posts

Friday, May 31, 2013

In Full Bloom - Building A Table Arrangement


As a flower lover, spring is naturally one of my favorite seasons.  And one of the most lovely things about living on the West Coast is the array of flowers so readily available at the local markets and grocery stores.  It's a bit dangerous for me actually. Just ask my husband...I'm totally the girl that swoons over the buckets of freshly cut flowers - sometimes he has to drag me away and remind me what we're actually shopping for.  Bad, I know.
Anyhow, I worked at a flower shop for a bit in high school and took a few floral arranging classes, and have also worked with a few brides to create their one-of-a-kind bouquets, boutonnieres and corsages.   So I admit, my floral knowledge and experience may be greater than that of the average homemaker, but building an arrangement doesn't have to be difficult or intimidating.

So I thought I'd share a few tips for building a simple, but stunning table arrangement.
  1. Choose a vase appropriate for your table. 
    • If your arrangement is for a dining table, try to keep your arrangement low so your guests can see above it.  
    • If for a night stand or bathroom sink, I like to use mason jars.
    • And for my coffee table, I tend to like short vases with wide openings {I actually use a short drinking glass I found at a thrift store}.  
    • Keep in mind, the wider the opening of your vase, the more buds you will need to fill it.
  2. Pick a flower and stick with that one type of flower.  Be sure to buy enough to fill your vase. 
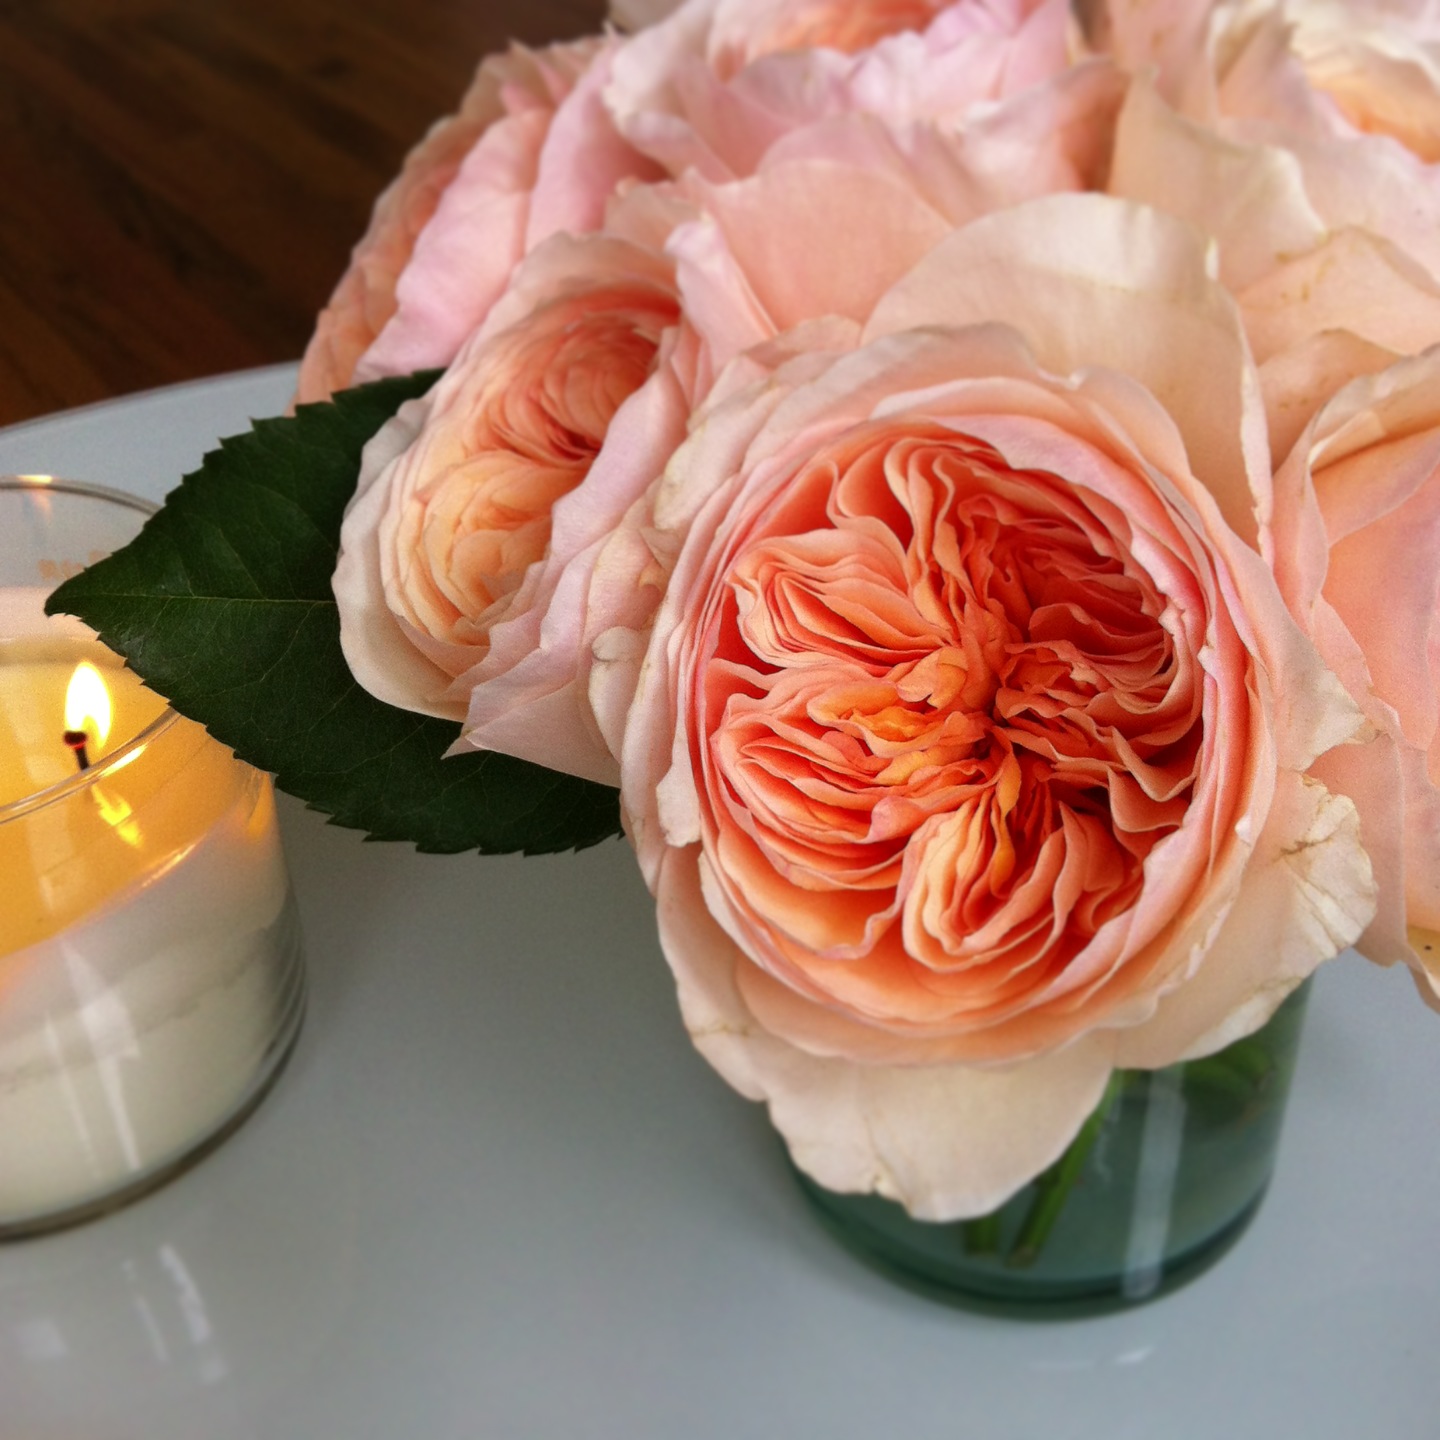
    • I love garden roses, anemones, or peonies to name a few.  
    • Gerber Dasies and Hydrangeas are great at making a statement as well.
  3. Arrange.  Run a stream of cold water in your kitchen sink and with sharp scissors or garden shears, cut your flowers at a slight slant to the desired length.  Be sure to remove any extra leaves that would be sitting in the water.  {These leaves tend to sop up water and breed bacteria, harming your precious blooms.} The blooms that rest on the outside of the arrangement should be slightly shorter than the ones that stand in the middle - arrange the outside blooms first and work your way in.  
  4. Voila!  You have a beautiful arrangement ready to proudly display. 
    • Lastly - Be sure to check your water levels daily, freshly cut blooms will drink up quickly.

Here are a few of my recent floral arrangements...

{Garden Roses}

{Garden Roses}

{Peonies}

{Hydrangeas}

{....and of course, more Peonies}

I would love to know!  What are your favorite fresh cuts to have arranged in your home??  
Let me know in the comments below.

XOXO


- images via Danya Collyer

Monday, March 4, 2013

2013 Adventures!

Hi Friends,

So 2013 has many new things for us already!

Remember that little flood we had last fall?  Well, since then we've been on the hunt for a new place to call home here on the West Coast.  After much praying and much much searching, we've finally found our new apartment and we moved in over the weekend!  I can't wait to share photos with you once it's a little more unpacked and complete - until then here is a pic from my instagram.


Aside from the apt hunt, I've taken on some other things as well.  One of them being an opportunity to volunteer weekly at our local pregnancy center.  It's been such a different ministry for me to dive into, but one I'm excited to be part of.

AND if that's not enough, I'm exploring a new and exciting business venture!  {More on that later.}

With that said, we've been a bit busy over here and PinkPeonyStyle has been a little neglected *sad face*.  But with a pretty new apartment to decorate and a new design project for a client underway, I'm excited to share my fav design projects and inspirations with you over the next few months!

So tell me - has 2013 been full of change for you as well??

Looking forward to posting again soon!

XOXO

Friday, December 14, 2012

Herbal Honey : A Homemade Christmas Gift Made with Ease and Love

Hi Friends!  Melanie here, I have an easy DIY Christmas gift to share with you today!


The parties, the eggnog, the gifts, JESUS -- Christmas is such a beautiful time of year.  For me, what often gets in the way of the holiday sparkle is long shopping lines, grumpy grinch crowds, and dare I say it, burnt cookies.  It can often be a time when wonder and chaos unite and never leave our side until the credit card bills come in January.

Wouldn't it be great if you could make a gift from home that someone could actually use? Better yet, what if you didn't have to go shopping for the ingredients?! 


I made 6 of these tasty treats in 15 minutes all with ingredients and supplies I had in my pantry.  Homemade gifts don't have to be time consuming or require hard to get ingredient!

Flavored Honey

You have honey in your cupboard, right?  However you eat or drink honey, it is possible to enhance the medicinal qualities by adding herbs to it.  You heard me right, that underused, overflowing spice rack is about to get functional.  Herbal honeys are easy to make and substitute into almost any capacity that you use honey.  Your almond butter and honey sandwhiches will never be the same.  Drizzle over muffins, add to tea, top your waffles, or eat herbal honey straight out of the jar.  You can even use them as a barbaque glaze.  C'mon I'll show you how!


   After I washed and dried all of my glass jars, I added my spices and herbs to each jar. 


I heated the honey slightly until it was warm and runny.  Make sure it doesn't boil.  Next, I poured honey into each jar. 


I stirred each jar well and placed the lids once I let them cool.  Christmas gifts, done.  Store them in a cabinet for two weeks so the flavors can mingle, and your cute little presents are ready!  I've used mine before two weeks and they were still delicious, so if you're reading this on Christmas Eve, it's not too late.


You can find corresponding recipe cards for each herbal honey blend here and here to be included with your gift.
You can find the circular labels here.
My jars were from World Market, but any glass jar with a lid that holds one volume cup will do.


You will find the recipe for each herbal honey blend below. Choose 1, all 4, or create your own blend for a unique treat this Christmas.  You could simply make a rosemary honey or a cinnamon honey as long as you powder your herbs the possibilites are endless! The basic ratio to follow is 1/4-1/2 cup dried herbs or spices to 1 cup of honey.  All recipes below are adapted from Kami McBride's The Herbal Kitchen.
 

Barbeque Honey Glaze

Spread on chicken, skewered veggies, or fish before baking or grilling.

1 cup honey, warmed
1 T powdered ginger
2 teaspoons powdered rosemary
2 teaspoons powdered thyme

Powder your herbs in a spice grinder if they are still whole.  It will still be the same measurement above.  Add to a clean jar and stir well. Pour warmed honey over herbs and stir well. Allow to cool, then close tightly.

Spiced Honey

You will never be the same after trying this honey.  It tastes like a cinnamon roll.  Fabulous in tea or spread on pancakes, the possibilities are endless. 

1 cup honey, warmed
1 T powdered cinnamon
2 teaspoons powdered ginger
1/2 teaspoon ground cloves or allspice


Powder your herbs in a spice grinder if they are still whole. It will still be the same measurement above. Add to a clean jar and stir well. Pour warmed honey over herbs and stir well. Allow to cool, then close tightly.
.
Flexibility Honey

Perfect for a family member that suffers from arthritis.  This blend is packed with herbal anti-inflammatories.

1 cup honey, warmed
1 T powdered tumeric
1 teaspoon powdered ginger
1/2 teaspoon powdered juniper berries (no juniper berries? try powdered black pepper)
1/2 teaspoon powdered cardamom

Powder your herbs in a spice grinder if they are still whole. It will still be the same measurement above. Add to a clean jar and stir well. Pour warmed honey over herbs and stir well. Allow to cool, then close tightly.

Poultry Glaze Honey

Sticky sweet barbeque chicken.  Makes you wonder what is in those jars of BBQ glaze at the store, doesn't it?

1 cup honey, warmed
1 T powdered coriander
1 teaspoon powdered paprika
1 teaspoon powdered cumin
1 teaspoon powdered tumeric
1/2 teaspoon powdered thyme
1/2 teaspoon powdered clove
1/2 teaspoon powdered celery seed

 Powder your herbs in a spice grinder if they are still whole. It will still be the same measurement above. Add to a clean jar and stir well. Pour warmed honey over herbs and stir well. Allow to cool, then close tightly.

I hope you will give this easy project a try as homemade gifts for others or to use in your own kitchen.


Merry Christmas, from my family to yours!

-Melanie
The Grecian Garden

- all images via Melanie 
{please ask to reproduce, or properly link if you desire to share via your own blog}

Wednesday, October 24, 2012

DIY : Chic Serving Trays

I love that all it takes to spruce up a space is something as simple as a new shiny accessory.  And what makes a new accessory even better??  A personal touch of DIY!

Serving trays are so tres chic and can be easily found at almost any thrift store or craft store.  A tray makes the perfect surface for a collection of small books, displaying jewels and baubles, a small bundle of fresh florals or even makes a great catch all for keys and small things near the front door.  Of course, you could always use one to do what the name suggests - serve, as well.

Take a look at these pretty little DIY trays I found throughout the world wide web - maybe you'll be inspired. ;)
{their links will take you straight to the diy instructions}


1 // 2 // 3 // 4 // 5 // 6


Happy Wednesday!!

XO

Tuesday, October 23, 2012

Decor : Mustard


Isn't this a beautiful mustard wall?  It was actually hand painted...check out the link above to see before, during and after photos!

Happy Tuesday!

XO

Tuesday, September 25, 2012

Home : Pumpkins Go Chic

Fall is in full swing in our home and I love it!  From spiced candles and treats, to a fire-lit living room at night, the only thing that's missing is fall decor.  {I sold all of my stuff in FL before our big move.}  

Today, I picked up a few pumpkins at my local grocery store and hope to make them chic.  

From glitter to paint, the options are endless.  I'm not sure just how I plan on displaying my fabulous pumpkins, but I'll be sure to share once I decide.

Here are a few photos of inspiration...


1 // 2 // 3 // 4 // 5 // 6 // 7 // 8

Are you planning to decorate with pumpkins this year? 


XO

Thursday, September 13, 2012

Home : Shelf Lining

Fabric, wrapping paper, and wallpaper - what do they all have in common?  They've all been used to line drawers.

While I love the idea of dazzling your drawers and giving them a personal touch with liner paper, lets face it - it's so incredibly difficult to find pretty liner paper.  I've searched high and low for attractive liner paper and I always end up empty handed.


{Truth be told, I saw this on pinterest and was shocked - it's the only cute lining paper I've seen, but it could easily get pricey trying to line an entire set of drawers @ $25/6 pieces.} 

I admire my girlfriends who modpodge fabric or wrapping paper to the bottom of their drawers, but I don't have the time or desire to deal with the mess of all that.

My favorite method?  Wallpaper.

It's thick enough, sturdy enough and comes in an array of beautiful designs.  And it's not impossible to find a bargain if you have a lot of lining to do.

I've seen tutorials on using spray adhesive, but I recently read that double sided tape does the job just fine.  So girlfriend, find yourself a drawer that needs lining.  Find a chic wallpaper print and get to work!  Those drawers are just dying for a facelift!


1 | 2 | 3 | *4


XO


*image source unknown

Tuesday, September 11, 2012

Who's That Girl?

It's no secret that the blogging world is just exploding with talented women worth following.  And I admit, it can be a bit overwhelming trying to decide who's worth your time.  So I thought it would be fun to shine the PPS spotlight on one of those noteworthy women on a weekly basis.

Welcome to Who's That Girl?

--

Love Etsy, Anthropologie, healthy living & blogs??  Then you need to meet Bonnie Christine from Going Home To Roost.


A friend of mine introduced me to Bonnie's blog and I fell in love with one simple click.  She has a knack for all things pretty, simple, and domestic.

You'll find beautiful patterns & textiles, healthy and fresh {vegan} recipes, great diy projects, and even honest advice on growing your blog or online business!

{The cherry on top - she gives away printables & desktop backgrounds as freebies on a monthly basis!}

And that's not all {I know, this girl has it goin' on!} - my favorite part of Going Home To Roost is the brand new super-dee-duper Roost Tribe!  Roost Tribe is a $5/month subscription service to all things Bonnie Christine.

As a Tribe member, you'll receive :


Amazing right??  I think it's worth every penny.  But tribe member or not, Bonnie's blog is beautiful and I'm sure you'll be inspired by her!

You're welcome.  :)

XO


- photos via Going Home To Roost

* Do you have a blog you'd like to see featured on Who's That Girl?  E-mail me! 

Tuesday, August 28, 2012

Home : DIY Terrariums


So you know those cute little succulent terrariums we're seeing all over Pinterest these days?  Well, I couldn't resist making one {or three} for myself.  Who doesn't love a pretty little plant pristinely layered in a pretty little jar?

This was such an easy and quick project, but I learned a few things along the way and thought I'd share...


You'll need :
- A jar {mason jars are adorable, or fancy jars/vases work, fish bowls are cute too!  I recycled a few salsa jars and found a fun fancy one at Marshalls.}
- Pebbles {found at a home improvement store or a pet store if you want different colors}
- Soil {make sure it's suitable for succulents}
- Activated Charcoal {found in pet stores, in the fish department - activated carbon is the same thing}
- Spagnum Moss {optional, also found at a home improvement store}
- An Assortment of Succulents {cuttings will work too, if you already have succulents around your yard. Cut them, trim the leaves around the base of the cutting and lay out to dry for 2-3 days.}
     - Rooting Hormone {home improvement store - but only needed if using succulent cuttings}


{ignore the bobby pins, those were for another project}
Assemble :
  1. Clean your jar and make sure no soaps or chemicals remain.
  2. Layer in this order :
    1. Pebbles
    2. Activated Charcoal
    3. Soil
  3. Now you're ready to arrange your darling succulents - if using a cutting, dip the tip in water and then coat in rooting hormone before planting.
  4. Top with moss.
You have a terrarium!  Easy right?


{layer}

{dip}

{arrange}

{voila!}


I will say this little project can get expensive if you don't have many of these things on hand.  I suggest going halvsies with a friend and doing it together - you'll most likely have plenty of supplies to make several terrariums.  Plus projects are better with girlfriends anyway, right?

Link up if you have made terrariums in the past...would love to see!

I'll be happy to answer any questions you may have as well {if I can}. :)

Happy planting!!

Related Posts Plugin for WordPress, Blogger...
©Pink Peony Style - Designed by BDD