Showing posts with label free. Show all posts

Monday, March 10, 2014

Banana Almond Bites


Clean eating 2014 is still going strong.  I've always been one to eat well, but when reaching for a quick little something to snack on, unless it's been prepared in advance, I usually grab something packaged (like popcorn or granola bars or dare I say it?  Chips! *gasp*).  Over the past few months I've been trying to make snacks from fresh foods - it's not always easy, because lets face it, us Americans want instant gratification when our tummies begin to growl or our energy plummets.  Let me introduce you to one of my easy, protein boosting goto's - Banana Almond Bites.

These remind me of my mom's peanut butter banana sandwiches when I was a kid.  On a good day I'd get a little surprising burst of sweet honey, oozing from the insides.  Good memories.  

I know this recipe is nothing mind blowing or totally original, but I thought I'd share for those looking for little ideas to add to their daily recipe box.

Banana Almond Bites

- 1 Ripe Banana
- Almond Butter (my favorite is Justin's)
- Clover Honey
  1. Slice bananas into 1/2 in pieces. 
  2. Spoon almond butter onto banana slice and top.
  3. Drizzle with honey.
Yummy! You could also sprinkle a little protein powder on top for an extra energy boost. And if you wanted to get really creative with it - you could spear them with toothpicks and dip them in melted dark baking chocolate and freeze for a sweet little treat. (I may have to do that and report back with the results.)

What are your fresh and easy goto snacks?  Would love to hear!

XO
d

Friday, October 4, 2013

Pumpkin Chocolate Chip Cookies


Can you believe we’re in the first week of October already?!  Where has the year gone?  I certainly won’t complain.  It’s been a great year thus far and I’m happy to welcome the fall season.  I’ve never lived in an area that experiences a full change of seasons, but I still get excited at the thought of holidays being just around the corner, gathering with friends and family over really great food, activities such as pumpkin carving and running through a corn maze, sipping on hot tea and warm apple cider, and pulling out all of those yummy spiced baking recipes.  Fall is just so warm, friendly and cozy - what’s not to like?

Over the years I’ve become known for my Pumpkin Chocolate Chip Cookies (PCCC).  Come fall, it’s almost expected that I bake a batch for any social gathering.  A few years ago, my bridesmaids even went out of their way to make a batch for my bridal shower (in October) because they knew I loved them so.  I know...pumpkin and chocolate?  That was my first thought too.  But trust me on this one, these are so scrumptious!  They’re a little less like a cookie and more like a bread, but in perfect little bite sized portions.  Seriously, so good.  

Turning my original recipe into a gluten free recipe was a bit tricky, but I’ve had 3 years to perfect it and think I’ve found a suitable flour to substitute for a fabulous gluten free PCCC.  That said, let the baking begin!  What better way to get into the fall spirit, than by baking with a little pumpkin?


Pumpkin Chocolate Chip Cookies

1 1/2 C Canned Pumpkin
1 C White Sugar
1/2 C Canola Oil
1 Egg
*2 C of "Cup4Cup Gluten Free Flour" (from Williams Sonoma)  
2 t Baking Powder
2 t Ground Cinnamon
1 t Pumpkin Pie Spice (I use Trader Joe’s - otherwise a dash of ground nutmeg, ground ginger, allspice and a little lemon zest works nicely too)
1/2 t Salt
1 t Baking Soda
1 t Milk
1 t Vanilla Extract
2 C Semisweet Chocolate

  1. Preheat oven to 350 degrees F (175 degrees C).  Dissolve the baking soda with the milk and set aside.
  2. In a mixer combine pumpkin, sugar, vanilla, canola oil and egg.  Mix until smooth.
  3. In a separate bowl, whisk together flour, baking powder, ground cinnamon, pumpkin pie spice and salt. Add baking soda mixture.
  4. Slowly add dry ingredients with wet until completely mixed. (Be careful not to over mix.  This is easy to do when using gluten free flours.)
  5. Fold in chocolate chips.
  6. On a parchment lined baking sheet, drop by spoonful and bake for 10 minutes or until lightly brown and firm.
  7. Let cool and enjoy!
*I also had great results with the Pamela’s Baking Flour.  These two flours gave me the best results.  I did try several different flour combinations (rice, tapioca, coconut, etc) but was sorely disappointed.  
**If using regular wheat flour, do 1 C Canned Pumpkin and 2 C Baking Flour.

I can't wait to hear what you think!  Happy Fall!


Friday, September 13, 2013

It's Personal {+ a giveaway}


A few weeks ago I began a new job as a merchandiser for a really special company called Chloe + Isabel.  I can't wait to tell you what I love about this company and why I've chosen them, but first a little personal note...

I've been debating a home based business vs. giving private music lessons again vs. a real job out there in the "real world" for a long time now.  As explained in a recent post, I've been in a funky season.  And in this season, I've had a lot of time to evaluate my life, the hopes and dreams I've carried with me since I was a kid and the things I'm good at.  In the midst of all of my planning and striving to find my niche, one small little thought continues to nag at my heart, "Take a risk.  Put yourself out there."  That thought makes my skin crawl.  I've put myself out there and it hurts.  

When I first began this blog, I never intended to fully let people into my life, nor my heart, and I certainly wasn't going to share my music.  But I've been playing it safe for a while now and things aren't going the way I thought they would go.  I truly truly truly feel that, that small nagging voice is the one I need to listen to, so rebranding PPS and making it all a bit more personal is a BIG step for me.  It's huge in my world, but I'm excited about where things are headed.  

That said, I'm also moving forward with pursuing more opportunities in my music.  A career as a recording artist has been my ultimate dream as long as I can remember and it was put aside once B & I got married.  I knew God was calling me to find confidence as a wife and to invest in my marriage, so I laid down a lot of things that I was passionate about and really good things came as a result.  The cool thing about God-given gifts though, is that often times He only calls us to lay them down for a season while He prunes and perfects other areas of our lives.  It's safe to say, I've been pruned and I've been prepared and I think my heart is ready for more.  Ready to dive in and give it my all and ready to open it up to whomever may benefit from the lessons I've learned, the life I've lived and the pain I've experienced.  Life is messy and life is good - and it's meant to be shared.

So this is where Chloe + Isabel comes in.  Chloe + Isabel caught my attention a few months ago and I just couldn't forget about it.  I'm always looking for ways to supplement our income and for years, I've dreamt of owning my own business.  The more I learned of c+i, the more I realized it was a great fit for my life in this moment.  It's a fairly new direct sales jewelry company based in New York City, that empowers and trains women to be creative entrepreneurs.  Each piece is designed exclusively for c+i in NYC and is handcrafted, nickel free, lead safe and backed by a lifetime guarantee.  Not only is the jewelry beautiful, unique and made of high quality (some organic) materials, but they've set their merchandisers up for success.  From the ground up, they've designed a website that each merchandiser can personalize and use as their own online boutique.  And they don't let just anyone become a merchandiser.  Each merchandiser is approved and interviewed before being accepted, ensuring that geographical locations aren't saturated with c+i merchandisers and that we fit the brand just as much as they fit into the lives of their merchandisers.  It's truly a fantastic company, one I'm proud to be a part of!  Over the next few weeks I'll be building relationships with local businesses, charities and events to partner with as well as selling the jewelry through my online boutique.  Feel free to take a look around, do a little shopping and a little dreaming.  If you create a free account, you can add things to your cart (aka wish list) and potentially win those pieces through my promotions or through hosting your own pop-up shop (email me for more info about that if you're interested - in Cali or not).  C+I pieces make for great gifts, so remember me when shopping for bdays, graduation, mom's day, sisters, girlfriends, Christmas, etc.  

So where's the party?!

To celebrate this new and exciting season, I'm giving away one of these beautiful leather wrap bracelets to anyone who spends $50 or more in my shop using this link.  If you shop + share my link {or this image} via your social media outlets you gain extra entries {just be sure to leave a comment below with a link to your extra entry, so I know to add it to the giveaway}.  All orders over $100 get FREE shipping. Winner will be announced Friday, September 20th.


Thank you so much for your friendship, encouragement and support as I follow after my dreams and venture out into new territory with the blog, my music and the business.  I'm really excited to follow hard after my Creator and can't wait to see what He has ahead.


Friday, July 26, 2013

Watermelon Cake

So I left you hanging with my 4th of July post!  My watermelon cake was a total success!  I seriously couldn't believe it.  After my little convo with the Trader Joe's employee, I was sure my efforts were about to be a waste, however, that was totally not the case!

Sure it's a no-bake "cake" and it looks so simple, but I assure you, this recipe is not for the faint of heart.  Cutting something as large, heavy and dense as a watermelon into the shape of a cake while trying not to sever a finger proves to be a tricky task.  But with hubby's muscles ;) and my sheer determination, together we conquered the watermelon cake.

I will say, my kitchen has never seen such a mess!  It looked as if it had rained watermelon {seriously, puddles of juice were everywhere} and snowed coconut and almond shavings - Blakely was quite the help in the clean up.


It's one heavy cake to transport {I did not cut it into pieces as the original recipe instructed because I was transporting it and I didn't want to worry about it falling apart from point A to point B}, but it's one stellar looking piece of fruit, don't you think?  Here is the original recipe, complete with cutting diagram : Paleo Watermelon Cake if you wish to make your own.

A few tips - be sure to pat the watermelon as dry as possible before "frosting."  I suggest refrigerating "frosted cake" for a few minutes before decorating to allow the frosting to adhere to the melon.  And the coconut whip was a perfect compliment to the fruity watermelon, I highly suggest it!  I admit, I sweetened it a bit so it would be a little more dessert like....shhh don't tell.

Have you attempted a watermelon cake?  I would love to hear about your experience!


    XOXO


- All images are property of Danya Collyer.  Please do not use without written permission.  

Tuesday, July 23, 2013

Chocolate Peanut Butter Oreo Mousse


In response to an instagram photo I posted over the weekend, I had many recipe requests for these decadent dessert cups.  We had some friends over for dessert last Saturday and while I was perusing Pinterest for dessert-spiration, I found a recipe for a Peanut Butter Chocolate Pie-ish looking thing and that was the magical moment I knew I'd serve up individual cups of rich chocolatey, peanut buttery, oreo goodness.  {<-- major run on sentence, I know. But describing these cups of glory isn't easy.}

Now one must be warned before attempting this no bake recipe - rich chocolate and peanut butter mousse layered between oreo cookies and mini peanut butter cups requires lots of "testing"and "tasting" along the way. ;)  Also, I wouldn't classify this as "healthy" as I do most of my recipes.  This is an all out sugar fest - one you may need a strong black cup of coffee to sip alongside just to balance the sweet party dancing it up in your mouth.  But I assure you, it's a winning recipe.  One your guests will be talking about for years to come...or so I'd like to think. 

-- And since I have my beautiful new laptop *giddy grin* I couldn't help but pretty up the recipe.  Enjoy! --
     

Let me know if you make them, I'd love to hear your thoughts!! 

      XOXO ~

- images via Danya Collyer.  Please do not share without written permission.  

Monday, June 3, 2013

Food : Fruity Ice Cubes


I just love fruit!  Especially now that so many of my favorites are in season right now.

I think I mentioned in my Mocha Frappuccino post, that I'm trying to be sugar free {not including the natural sugar of fruit of course}, so I've had to be creative when curbing that craving and satisfying that terrible sweet tooth!  

I've never been a big soda drinker, but I do like a sweet drink from time to time.  So to satisfy that desire for something sweet, I've started filling my ice trays with my favorite fresh fruits and berries and adding them to either plain water, or plain fizzy water.  It's so yummy!  

Not only does your drink look beautiful, but there's a fun, sweet treat awaiting you at the end of that glass. And if you want to take the benefits one step further, you're doing your body a favor - fruits and herbs have been known to help fight free radicals, clear your skin, sooth your digestive system, boost your energy, lower cholesterol and alkalize the entire body!  Why wouldn't you add fruit to your drinks?!

These are a few of my favorite combinations : 

Berrilicious
- Raspberries 
- Blueberries
- Strawberries

Island Delight
- Mango
- Pineapple
- Frozen in Coconut Water

Pucker Up!
- Mint
- Lemon

Just Peachy
- Mint
- Peach

Southern Gal
- Lemon
- Lime
- Rosemary

*Combine your ingredients with about 1 C of room temp water, mix well, cover and let flavors fuze in the fridge over night.  Fill your ice tray and let freeze.


The options are endless, so drink up!

XOXO


- image via Danya Collyer

What are your favorite combinations?  Leave a response in the comments below.

Tuesday, March 19, 2013

Breakfast Lox & Hash

So I've been in a smoked salmon kick these days.  Over toast, cheese and cucumbers, wrapped in my sushi or over my breakfast hash - I can't get enough of the stuff!  So this morning when my craving hit, I knew just what I was going to make, but first I have a story to share.

A few months ago, hubby and I ventured out to a cute little red cottage cafe for brunch.  To my dismay they were out of eggs, so no omelet for me.  This gfree girl has few options other than eggs when eating out for bfast, so you can imagine my disappointment when the waitress informed us of their outage.  She did, however, let me know that they had a special gluten free lox plate that morning and assured me it was far better than any omelet they could have made.  Left with no other options, I ordered the lox.  To my surprise, fresh lox spread over a bed of potatoes and cream cheese was quickly a new favorite!

Now my smoked salmon kick would not be complete without trying my hand at that delectable little dish I encountered at that quaint cottage cafe.  My version is a little different - and I'd like to think a tad bit healthier, but who's really keeping track here?  To be totally honest, after snapping a few pics, this plate was licked clean in a matter of seconds.  I utterly inhaled the stuff - and I have a feeling you will too!

Enough from me...here's the recipe.


Breakfast Lox & Hash

- 1 Small Package Smoked Salmon {or lox - whatever you desire to call it}
- 1 Bag Frozen Hashbrowns
- Nonfat Plain Greek Yogurt {or sour cream, if you wish}
- Capers
- Fresh Dill
- Salt and Pepper
  1. Cook hashbrowns according to package - salt and pepper to your liking.
  2. Transfer hash to your plate, spread 2-3 tablespoons of plain Greek yogurt over hash and layer salmon over top.
  3. Garnish with 1 tablespoon capers and fresh dill. Enjoy!
Totally simple right?  I'd recommend this one for breakfast guests.  It's easy, packed with flavor and totally impressive!


XO

Thursday, March 14, 2013

Warm Quiona & Roasted Veggie Salad

So on date night a few weeks ago, food-spiration struck as soon as my quinoa salad was placed on our table.  Warm and crisp, light yet substantial - such a nice change to my salad routine.  I knew it wouldn't be long before I would be recreating a version of my own.  Tired of hummus and rice bowls, this afternoon was the perfect time to give it a try.  {And now...I'm slightly obsessed.}

So here it is....let me know what you think!


Warm Quinoa & Roasted Veggie Salad


- 1 C Quinoa, rinsed
- 2 C Gfree Chicken Stock
- 1 t Salt
- 2 Cloves Garlic, minced
- 1 Roasted Red Bell Pepper
- 1 Can Artichoke Hearts, quartered
- 1/4 C Walnuts, chopped
- 1/4 C Dried Cranberries
- Arugula
- Goat Cheese
- Balsamic Vinegar & Olive Oil {or a vinaigrette dressing of your choice}

  1. Combine chicken stock, salt and quinoa in a small pan and bring to a boil.  Cover and let simmer on low for 15 minutes.
  2. Fold garlic, pepper, artichoke, walnuts and cranberries into cooked quinoa.  Salt and pepper to taste.
  3. Scoop quinoa mixture onto a bed of arugula and top with crumbles of goat cheese and drizzle dressing over top and dive in!


What do you think?  Do you love warm salads?


XO

Thursday, September 27, 2012

Food : Pumpkin Chocolate Chip Cookies

Pumpkin, pumpkin and more pumpkin!  I just love the stuff!  

I wait all year for fall to arrive so I can break out my Pumpkin Chocolate Chip Cookie {PCCC} recipe.  Pumpkin + Chocolate?!  It's divine.  


I wish I could tell you where I got this recipe, but sadly I cannot.  I've revised it a bit, but if it looks familiar and you know who deserves the credit, please let me know.  Until then, mystery PCCC recipe creator, you are genius!  I thank you from the bottom of my fluffy, fall-baking-enlarged behind.  

I have to say, it's been tricky converting this to my gfree satisfaction.  If you're a gluten consumer, I've included notes on how much flour to use.  If you're gfree as I am, use the measurements I provided - any more flour and they will be too dry. {Trust me on this one.}

Prepare to fall in love...and you're welcome to your personal trainer or gym buddy for encouraging the need for extra workouts.  ;)


Pumpkin Chocolate Chip Cookies


- 1 1/2 C Canned Pumpkin {use more and you get a more gooey, cake-like cookie, less and a more firm cookie}
- 3/4 C Sugar
- 1/2 C Oil
- 1 Egg
- 1 tsp Vanilla
- 1 1/2 C Gluten Free Flour Blend { I use 1/4 C Arrowroot Powder, 1/4 C Coconut Flour, 1 C Rice Flour.  If you like a firmer cookie, add an extra 1/4 C Coconut Flour.  I prefer the cake-like texture, but hubby likes the more cookie-like texture, so my flour ratio depends on who I'm making them for.}  For my gluten eating friends, use 2 C Regular Baking Flour
- 2 tsp Baking Powder
- 1 tsp Cinnamon
- 1/2 tsp Nutmeg
- 1/4 tsp Allspice
- 1/2 tsp Salt
- 1 tsp Baking Soda
- 1 tsp Milk
- 1 C Chocolate Chips  {I always add extra}
- Nuts {optional - I usually do without, but if you're a nut lover - go for it!}
  1. Preheat oven to 375 degrees.
  2. Dissolve baking soda in milk & set aside. 
  3. In a large bowl combine pumpkin, sugar, oil, and egg. Stir. 
  4. Add flour, baking powder, cinnamon, nutmeg, allspice, salt, vanilla and baking soda mixture. Mix well. 
  5. Stir in chocolate chips and then spoon onto parchment lined cookie sheet. 
  6. Bake at 375 degrees 10 to 12 minutes.  Let cool & enjoy! 
Happy Fall!!

XO

Tuesday, July 17, 2012

Food : Warm Summer Veggie Spaghetti with Artichoke Tapenade

While scanning the shelves at my local Trader Joes earlier last week, I found a yummy looking jar of Artichoke Tapenade.  I couldn't pass it by, so I added it to my pantry and quickly forgot about it.  Yesterday I found myself running an impromptu and very unorganized grocery run - while out, I remembered that little jar of tapenade.  Hmm?  What can I make with that?  Dinner!  I threw some veggies in the cart and headed home.

Now I know tapenade is for topping crackers and crostini, but I thought it would make a nice "sauce" for my summer veggie pasta.  I was right!  This meal turned out perfectly {and beautifully}!  Hubby thought it tasted like a dish from a fancy restaurant, and helped himself to more than one helping.  I'll definitely be making this again.  

Hope you enjoy! 

{Sorry this photo was a quick iPhone snap - next time I'll get a better pic with my Nikon.}

Summer Veggie Spaghetti with Artichoke Tapenade

1/2 lb Spaghetti Noodles, cooked according to package {I use rice, quinoa or corn noodles}
1/4 C Artichoke Tapenade {I'm sure a olive oil and garlic paste or a pesto would work nicely as well}
1 Bunch Asparagus, halved and steamed
1/2 C Cherry Tomatoes, halved
1/4 C Sliced Mushrooms, sauteed in olive oil
1 T Olive Oil
Salt & Pepper to taste
Fresh Grated Parmesan Cheese


  1. Prepare spaghetti as directed.  Meanwhile steam asparagus, and saute mushrooms.
  2. Once fully cooked, drain spaghetti.  Return spaghetti pot to stove and add olive oil, artichoke tapenade and noodles - fold till noodles are coated.
  3. Fold tomatoes, mushrooms and asparagus into noodle mixture and add salt and pepper to taste.
  4. Serve and sprinkle with parmesan cheese.  Enjoy!


-image via danya collyer.

Wednesday, July 11, 2012

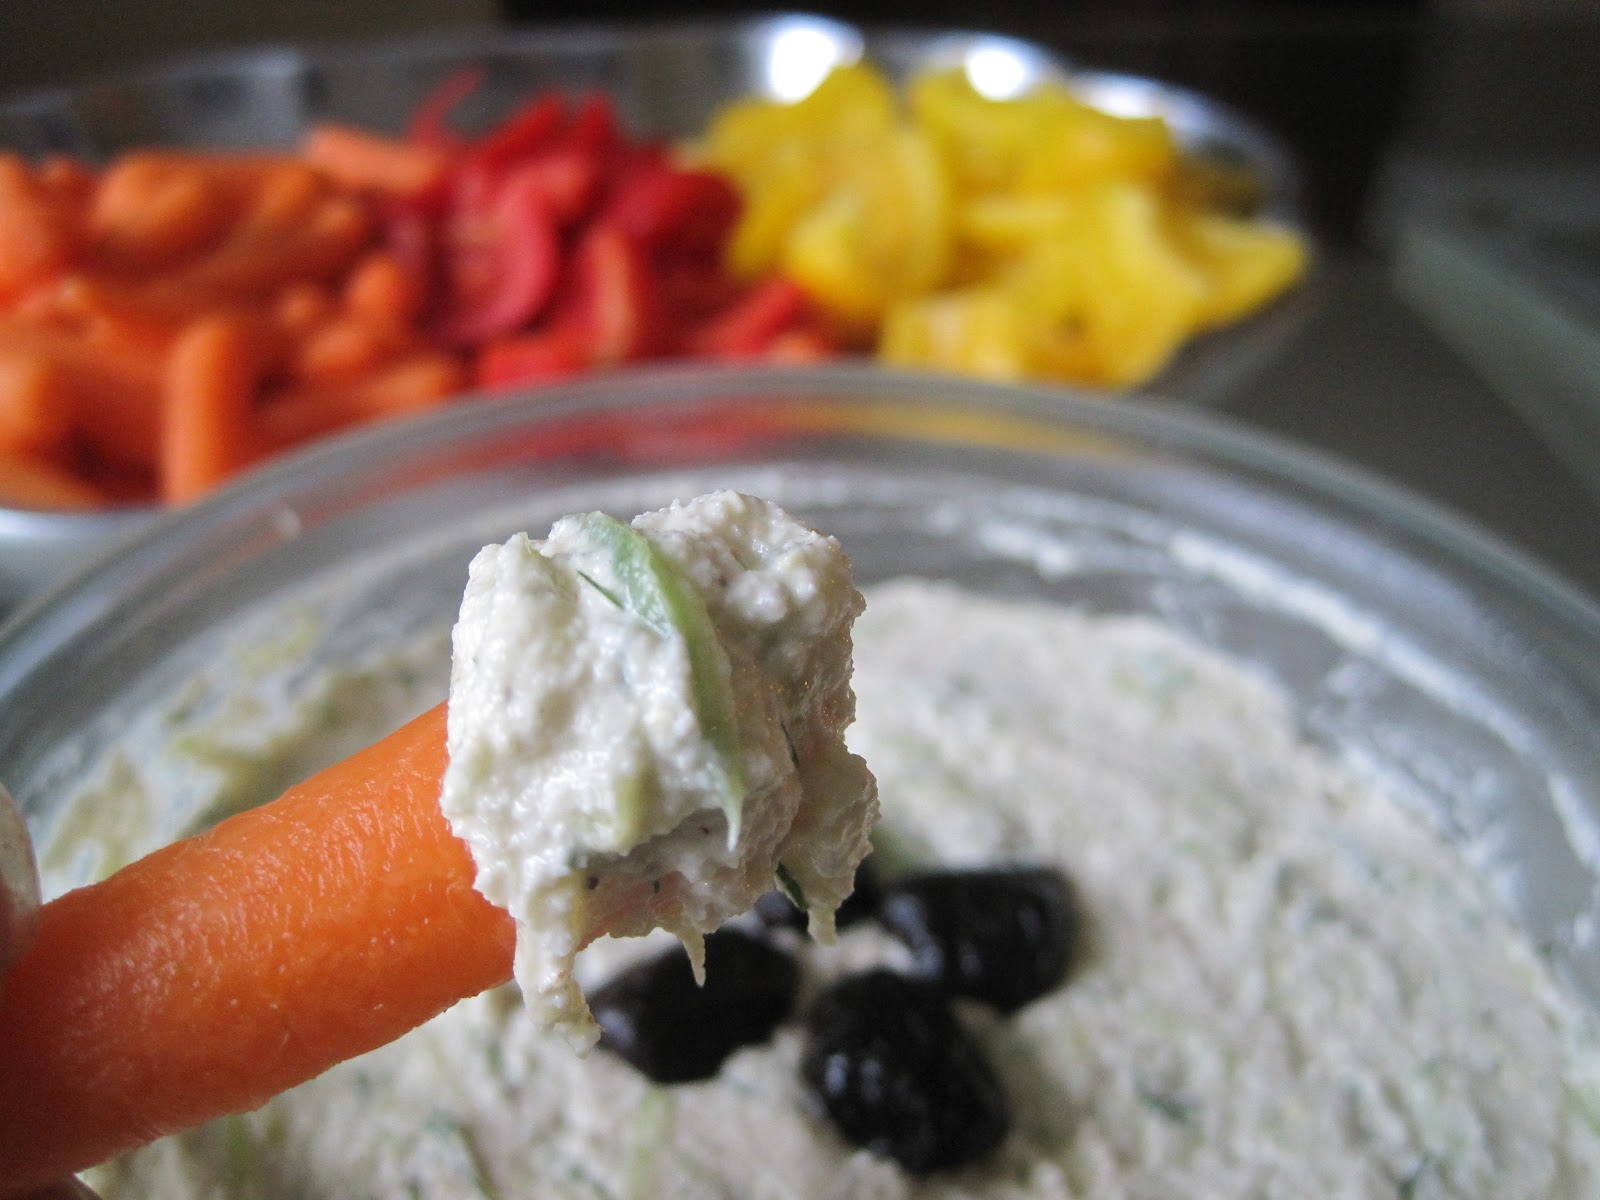
Food : Tzatziki {Dairy Free}


Hi friends!

Our local farmers market has me jumping for joy every weekend with awesome new ingredients to play with.  I've been buying figs from the sweetest old lady with hopes of turning them into fig cookies or a sweet summer jam, but alas they have been eaten way too fast for any such creations.  I did manage to restrain myself from making more lacto-fermented pickles with my bounty of cucumbers so we could enjoy this versatile dip.

In case you haven't noticed, I have an obsession with turning my once beloved Greek recipes into modern healthy versions.  Its quite common during the summer to find any one member of my family chowing down on a Gyro (YEER-oh).  The Greek sandwich that changed the world is a pillowy soft flat bread wrapped around tender lamb, lettuce, tomato, onion, and slathered in Tzatziki ( dza-DZEE-kee ).  The flavor combination of the sandwich has been forever engraved in my brain even though it's been years since I've actually taken a bite.  Since swearing off gluten and dairy the gyro of my childhood would have to be just a memory.  That is, until I realized with a few tweaks to my pine nut cheese that I may be able to re-create the faint memory of the creamy garlic spread from my childhood.

Hard work pays off. 

This is the dip dreams are made of.

Tzatziki

This creamy garlic dip can be a great vehicle for eating more veggies.  It goes great with chips too, although my favorite use is spreading it onto sandwiches or adding a dollop to the protein of your choice.  

 2 medium seedless cucumbers, peeled and grated (about 2 cup)
1 1/4 cups pine nuts
 2 garlic cloves
1 T olive oil
2 T freshly squeezed lemon juice
1/2 tsp salt
1 T chopped fresh dill
kalamata olives for garnish

1.  Soak pine nuts in cold water for 20 minutes. Sprinkle grated cucumbers with a few teaspoons of salt  until some of the liquid is released. Squeeze any excess moisture from grated cucumber w/ a kitchen towel and add to a medium sized bowl.
2.   Rinse pine nuts and add to bowl of food processor along with garlic, olive oil, lemon juice, and salt.  Puree until well blended, adding more lemon juice to help the food processor along if needed.  Taste and add salt, lemon, or pepper to your liking.
3.   Stir pine nut dip and dill with grated cucumbers and chill until ready to serve.  Top with kalamata olives (optional) 


Delish!  Enjoy!

- Melanie


Thursday, July 5, 2012

Home : Hand Painted Walls

Have a room that's lacking that extra "pop"?  Paint it!

Paint is such an inexpensive way to transform a space and add a touch of "wow".  While giving a space a face lift through a change of color is nice, don't be afraid to think outside the box - think geometric patterns, stencils, two toned walls, or even creatively free hand something.  

Accent walls are perfect for large shapes and busy patterns, while two toned walls or faux textures are perfect for entire rooms.

Below are a few fun and creative examples of hand painted masterpieces.  Enjoy!


1 | 2 | 3 | 4 | 5 | 6 | 7


Wednesday, July 4, 2012

Happy Independence Day!

HAPPINDEPENDENCE DAY!!  

Hello Friends!

I so hope you have fun planned for today.  I have to say, it's truly an honor to be an American.  Cheesy to say, I know, but I really am so very thankful for my heritage, for my country and for all of the brave men and women who serve our country to ensure we have freedom each and every day.  So thank you.

This is my very FIRST 4th of July on the West Coast.  Boy is it dramatically different than what I'm used to.  The fourth is always celebrated with a large family barbeque and fireworks {which I believe we plan to partake in with friends here in Monterey}, but the big difference this year is I'll most likely be bundled in a hoodie as opposed to sweating it out in shorts and a tank. 

When asked to make something to bring to our get together with friends, I immediately tried to think of something cold, summery and red, white and blue {of course!}, so I was leaning towards popsicles.  But the more I thought about it, I realized it may be a bit too chilly for popsicles.  {That concept it just too weird for my brian right now.}  

So I hopped on MarthaStewart {she always has the best 4th desserts} and found this fun strawberry shortcake recipe {follow the link below}.  Not too cold, but still fruity and refreshing - perfect!  I'm going to attempt to do my own gfree version, we'll see how it goes.  If you have a great gfree shortcake recipe you want to pass along, I'd love to have it!


While I'm sad to be away from my family this year, I'm so thankful for all of the wonderful friends who have taken us in and treated us as family.  We're really looking forward to hanging out with all of them.

I'd love to hear what you have planned for the 4th, and would love to know what festive dishes you'll be making/made.

Have a wonderfully happy and safe 4th of July!

{OH!  And a shout out to my beautiful friend Jill - HAPPY BIRTHDAY!!  Miss you sweet friend.}

Lots of love {& fireworks}....

Thursday, June 28, 2012

Food : How To Fill & Frost A Cake


Last summer my mom and her sisters thought it would be fun to take a cake decorating class with their daughters.  So us girls pulled out our aprons, purchased our cake decorating kits and committed several week nights to honing our skills.

I'm by no means a pro, but I certainly learned a thing or two {or ten!} and I was reminded last weekend that practice makes perfect {hubby's birthday cake}.  While I was decorating, I thought it would be fun to do a post on filling and frosting a cake.  That was one of the most valuable things I learned last summer.   So here goes....  {Feel free to comment with questions if you have any. I'll do my best to answer.}

Baking
For hubby's bday cake I made a 6 inch gluten free chocolate cake and filled it with a raspberry filling and topped it with a homemade cream cheese frosting.  {you're salivating right?! I thought so. :)}  

The 6 inch cake pan is my absolute favorite!  Not only is it adorable and totally perfect for gifting a friend, but it's an easy and not so intimidating size to work with while learning to fill.  A 6 inch pan is a bit difficult to find in stores, so I ordered mine from amazon. {here}  When baking with a 6 inch pan, bake it at 325 degrees for 1 hour and 25 minutes.  {Be sure that your oven is at a legitimate 325 before inserting the cake and as tempting as it is to open the oven - don't touch that door! Let it completely bake for the required baking time.  This ensures you have a nice, fluffy cake every time.}

Use whatever size cake pan you'd like, I recommend something round for your first go at it.  Make your cake according to your recipe {I used a Duncan Hines Gfree Devils Cake box mix since I haven't found a great gluten free cake flour blend yet, and I doctored it up with a handful of semi sweet chocolate chips.}, thoroughly grease and flour your pan. {I use crisco - I know, gross.  But it's the best for guaranteeing your cake will completely come out of the pan.  I "flour" my pan with a thick layer of cocoa powder when baking a chocolate cake. I've used arrowroot powder or rice flour for a white cake.}  When baking time is up, remove from oven, transfer to a wire cooling rack and let cool completely.  I've learned the hard way to plan ahead.  There's nothing worse than spending lots of time and energy {and love} on a cake and then being rushed to decorate it and it's either a melty mess, lop sided, or sloppy.  I try to bake my cake the day before I need it.  

Filling
For my filling I used half a jar of store bought raspberry preserves with seeds {they look so pretty and fruity}.  You can use jam, preserves or even frosting - fruit preserves are usually my filling of choice.  

To make your filling use your preserve of choice + 1 tablespoon of butter.  Melt in a sauce pan over low heat, stir constantly.  Once it's a nice consistency, remove from heat and set aside.


Frosting
Make your frosting.  My absolute favorite frosting is a classic cream cheese frosting.  Crisco based frosting is disgusting {in my opinion} but is amazing for decorating with, so I will occasionally make a batch of this for details such as flowers, but I usually douse my cakes in a nice, thick layer of cream cheese frosting.  Here's my go to recipe:

1 8 oz Package Cream Cheese, Room Temp
1/2 C Salted Sweet Cream Butter, Softened
2 C Powdered Sugar 
1 t Vanilla {be sure to use clear vanilla if you want a pure white cake}

Combine in a mixer and mix until smooth.  

With a spatula, fill a piping bag with your frosting and set aside till ready to use.  

I have a featherweight cake decorating bag and decorating tips that I use for frosting.  If you don't have those, a large plastic ziploc will do the job.  Fill the bag, snip a corner tip off {not too much} and twist the top of the bag.


Cutting
If you only baked one cake and wish to cut into two halves so that you can fill it, you must cut the cake evenly.  This can be tricky.  Once again your cake must be completely cooled.  I have this nifty little cake slicer that gives me an even cut every time {and can be used to shave off the top of my cake if it's rounded}.  A large, sharp knife may be used as well, it's just a little more difficult to get an even slice.  

Cut your cake into two {unless you baked two cakes - if that's the case, even the tops and make them flat}.  Use your most even side for the top of the cake {if you can't get an even cut, turn the cake upside down and use the bottom side, this will be your top piece}.   

Assemble
Ok now we're ready to fill & frost!


The trick to getting your filling to stay in the center of your cake and not ooze all over the sides or into your frosting is to create a barrier with your frosting first.  {I forgot this step as you can see in this pic.  I was so excited to get that filling on that I completely skipped this step.  Thank goodness I remembered and had plenty of room on the sides to correct my mistake.  


Move the bottom half of your cake to the cake stand or plate you wish to serve it on.  {You can see in a pic below that my cake stand is sitting on top of another white rotating cake stand.  This is similar to a lazy suzan (which would work perfectly if you have one lying around), and is used to turn your cake easily while decorating.  Or you may purchase one here.}  

With your bag of frosting, frost the edge of the cake with at least two layers of frosting.  {This is still a necessary step if you're filling your cake with frosting.}


Next, spoon desired amount of filling onto center and spread with a spatula.


Now carefully place your top half of cake on top.


With your piping bag, pipe frosting onto the top and sides of the cake and smooth with a flat spatula.  Let sit before decorating.  The frosting will "dry" {or somewhat harden} if you allow it to sit and will be much easier to decorate.  

A handy little tip for achieving a flat surface is let your cake "dry" and then with parchment or wax paper, lay on top and gently smooth with a light rolling pin or flat spatula.  If your frosting cracks, gently smooth it out and let it dry again.  


Viola!  You have a beautifully filled and frosted cake ready for decorating!  Mine's not perfect, but like I said practice makes perfect.  


I hope this was helpful to you!  Happy frosting!!


- all images via danya collyer. 
Please do not use without permission.
Related Posts Plugin for WordPress, Blogger...
©Pink Peony Style - Designed by BDD