Showing posts with label greek. Show all posts

Wednesday, July 11, 2012

Food : Tzatziki {Dairy Free}


Hi friends!

Our local farmers market has me jumping for joy every weekend with awesome new ingredients to play with.  I've been buying figs from the sweetest old lady with hopes of turning them into fig cookies or a sweet summer jam, but alas they have been eaten way too fast for any such creations.  I did manage to restrain myself from making more lacto-fermented pickles with my bounty of cucumbers so we could enjoy this versatile dip.

In case you haven't noticed, I have an obsession with turning my once beloved Greek recipes into modern healthy versions.  Its quite common during the summer to find any one member of my family chowing down on a Gyro (YEER-oh).  The Greek sandwich that changed the world is a pillowy soft flat bread wrapped around tender lamb, lettuce, tomato, onion, and slathered in Tzatziki ( dza-DZEE-kee ).  The flavor combination of the sandwich has been forever engraved in my brain even though it's been years since I've actually taken a bite.  Since swearing off gluten and dairy the gyro of my childhood would have to be just a memory.  That is, until I realized with a few tweaks to my pine nut cheese that I may be able to re-create the faint memory of the creamy garlic spread from my childhood.

Hard work pays off. 

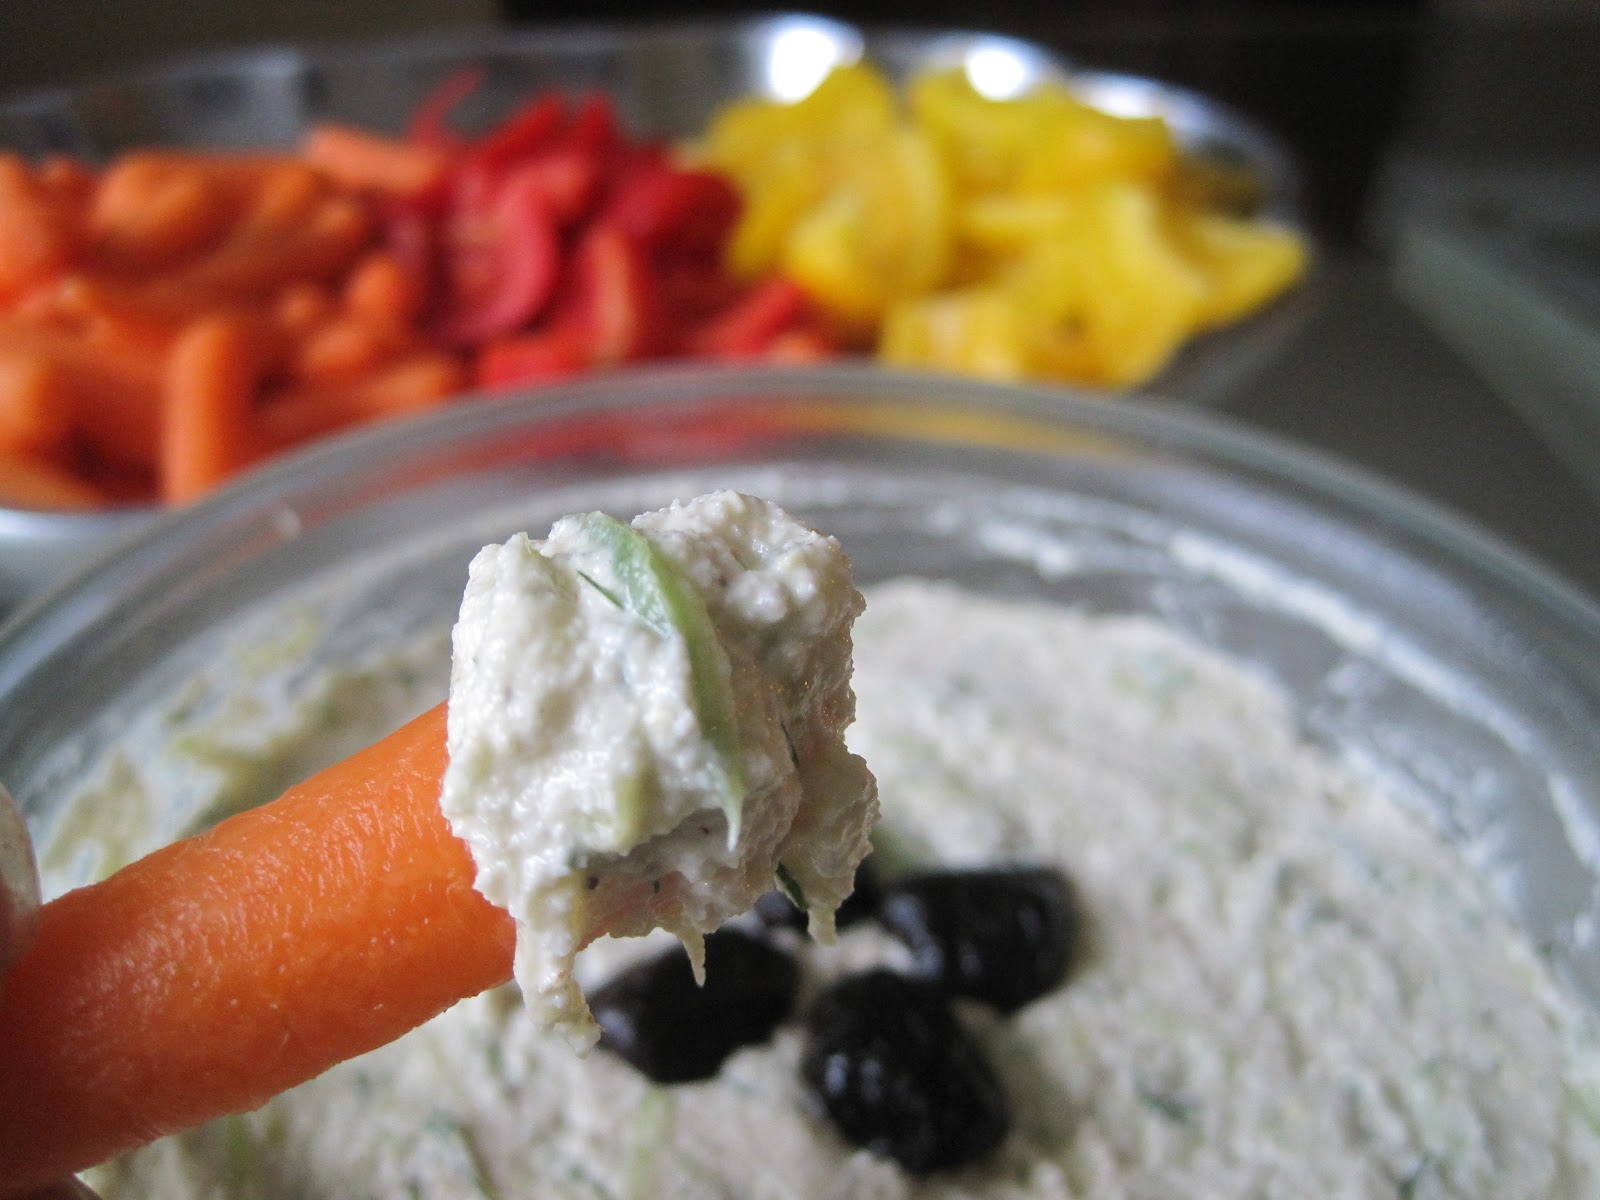
This is the dip dreams are made of.

Tzatziki

This creamy garlic dip can be a great vehicle for eating more veggies.  It goes great with chips too, although my favorite use is spreading it onto sandwiches or adding a dollop to the protein of your choice.  

 2 medium seedless cucumbers, peeled and grated (about 2 cup)
1 1/4 cups pine nuts
 2 garlic cloves
1 T olive oil
2 T freshly squeezed lemon juice
1/2 tsp salt
1 T chopped fresh dill
kalamata olives for garnish

1.  Soak pine nuts in cold water for 20 minutes. Sprinkle grated cucumbers with a few teaspoons of salt  until some of the liquid is released. Squeeze any excess moisture from grated cucumber w/ a kitchen towel and add to a medium sized bowl.
2.   Rinse pine nuts and add to bowl of food processor along with garlic, olive oil, lemon juice, and salt.  Puree until well blended, adding more lemon juice to help the food processor along if needed.  Taste and add salt, lemon, or pepper to your liking.
3.   Stir pine nut dip and dill with grated cucumbers and chill until ready to serve.  Top with kalamata olives (optional) 


Delish!  Enjoy!

- Melanie


Wednesday, June 6, 2012

Food : Parsnip Fries


Hi friends, Melanie from The Grecian Garden, bringing you a fresh new recipe.

On busy weeknights I, like you, need side dishes that are quick to prepare and won't chain me to the oven for a stir-a-thon.  Enter parsnip fries on the scene.  After peeling and a quick chop, I toss them in the oven, giving me 20 minutes to create the rest of my dinner.  


I'm constantly on the look out for a substitute for white potatoes.  I grew up eating the creamiest, mashed potatoes, this side of the Mississippi, on a weekly basis.  But it wasn't the creamy spuds that stole my heart.  It was the baked Greek fries that I couldn't get enough of.  Long gone are the days of stuffing myself with white potatoes, as they always seem to throw my tummy for a tizzy.  These days, I choose my carbs wisely - carbs that make me feel good.


Parsnips have a slight licorice flavor and paired with herbs such as rosemary or marjoram, they really come to life.  I hope you enjoy this quick weeknight side as much as we do.


Parsnip Fries

The thinner you make these, the crispier they will be.  I make mine more like steak fries to get the crispy exterior and the creamy interior.

- 1 lb of Parsnips
- 3 T Oil, plus extra for greasing {I prefer coconut, but olive oil will do.}
- 1 t Salt
- Pepper, to taste
- 1 T Freshly chopped Rosemary or Marjoram {or 1 tsp dried}
- Half a Lemon
  1. Preheat oven to 425 degrees.  Line a cookie sheet with parchment paper and lightly coat with oil of choice.
  2. Wash, peel and trim parsnips.  Cut into sticks as thick or think as you like.  Place onto cookie shed, coat with oil and sprinkle with salt, pepper, and rosemary.
  3. Roast for 20 minutes, turning half way through cooking.
  4. Sprinkle with half lemon just before serving.

I hope you enjoyed this recipe.  Be sure to check back soon for another yummy recipe!

- Melanie

- images via Melanie

Wednesday, May 30, 2012

Food : Quinoa Stuffed Zucchini Blossoms

Hi!

Melanie here.  I am so excited to join such a wonderful team, here at Pink Peony Style, created by my great friend Danya.  Danya and I share a love of good food that just so happens to be gluten free.  I enjoy making food that tastes so good, you or your family will never guess that it's gluten free {and healthy!}.  My favorite things to create in the kitchen are classic Greek dishes with my now healthy, g-free twist.  I'm thrilled to share my best recipes with you and I look forward to connecting with you here, on my blog, Facebook or twitter.  

Okay, enough about me.  Here's a recipe so intriguing, it really doesn't need an introduction. {Although it does involve eating flowers.}

Have you ever eaten flowers?  No, I'm not talking about those edible ones you buy at the grocery store in plastic containers.  I'm talking, strolling through your backyard {or your neighbors!} and being drawn in by such beauty that you had to take a nibble.  I can remember picking little yellow flowers in our backyard as a child and one day, the thought came to mind to taste the tiny yellow beauties.  I had never tasted something so bright and lemony!  We often think of flowers as being great additions to face and body potions, so why not share the love with our taste buds?  


Kolokythanthoi Yemistoi, or stuffed squash blossoms as they are called in Greece, is a traditional Greek appetizer usually stuffed with a combination of ground meat, herbs, and minced vegetables.  Both my husband and my father remember their Greek mothers gathering and stuffing squash blossoms from their gardens and filling them with a hearty meat filling.  

Last week, when I picked my squash blossoms, I didn't have any ground meat to make the traditional filling.  However, I did have some leftover quinoa in the fridge, so my recipe making wheels started to spin!  I soaked my zucchini blossoms and began to create the filling {which came together rather quickly since the quinoa was already cooked.}


Once I had my filling made, I began to stuff the blossoms. Since I had soaked them in water already, they were quite tender and easy to fill.  I simply laid them out, and one flower at a time, I gently lifted a petal and snipped the pistil or stamen from the inside.  Then I stuffed the bases with a small amount of filling and set them in a glass dish until I had finished stuffing the others.


Now that they were stuffed, they were ready to cook.  In less than 10 minutes I had the most delicate, savory appetizer.  I seared them for a few minutes in coconut oil on each side, for a total of 9 minutes.  {You could stuff them and keep them in the fridge until your guests arrive as they cook up fast.}  The flowers become tender, the filling becomes warm and each bite welcomes you into Greek appetizer heaven.  {Adding feta cheese to them is completely necessary if you can tolerate dairy.}


Quiona Stuffed Zucchini Blossoms

No squash blossoms?  No problem.  Simply use this filling to stuff mushrooms, artichoke buttons, or place of scoop of filling onto broiled eggplant.  Don't plan on there being any leftovers - these cute little blossoms are addicting {and not just to women...my husband ate his faster than I ate mine}.

Ingredients
- 18 Squash Blossoms {or whatever you plan to stuff}
- 1/2 Onion, chopped
- 1 Carrot, peeled & chopped
- 1 Stalk of Celery, chopped
- 3 Mini Sweet Red Peppers {or 1/2 of a large red bell pepper, chopped}
- 1 Cup Spinach, Arugula or other quick cooking green {optional}
- 3 Cloves of Garlic, minced
- 1/2 C Quinoa, cooked
- 2 T Fresh Dill, chopped
- 1/4 C Cranberries, finely chopped
- Salt & Pepper {to taste}
- 1/2 Lemon
- Coconut Oil
  1. Combine onion, carrot, celery, red peppers, spinach, garlic, quinoa, dill, cranberries, salt, pepper and lemon juice into a bowl.  Mix until blended.
  2. Lay one squash blossom flat on a napkin and while gently opening one petal while stuff 1/2-2 teaspoons of filling into each blossom.  Be careful not to over-stuff.  Twist top of flower blossom and lay in a dish until all blousoms are filled.
  3. Heat a 10 in skillet to medium heat and add 1 T coconut oil.  Reuce heat slightly and add stuffed squash blossoms 8-9 at a time.  
  4. Cook blossoms a few minutes on each side, turning every few minutes to cook all sides evenly.  {Mine were in the skillet for a total of 9 minutes.}  
  5. Once cooked through, place on a plate and sprinkle lightly with salt. Enjoy! 

I hope you enjoyed this recipe.  I would love to hear about your experience with making your own Quinoa Stuffed Squash Blossoms.  {Have you ever incorporated flowers into a dish?  If so, what?}

Stay tuned for more recipes and don't forget to enter the PPS giveaway.

- Melanie


This post linked with Friday Foodie Fix.

Tuesday, September 27, 2011

Back to Basics

Geometric shapes and patterns have been a staple in decor for the past few months and I LOVE it!  Bold or timid, large or small - you can't go wrong with these beautiful graphics found on just about everything from pillows to rugs, drapes to upholstery, accents to wall art.  Have you incorporated any of these prints into your space lately?


Thursday, September 1, 2011

Greek Pasta Salad

I'm a total foodie.  I love everything about food, it's an experience involving all of the senses.  I love creating it.  I love making it beautiful.  I love smelling it.  I love sharing it.  I love watching/hearing someone enjoy it.  And most of all, I love tasting it!  Needless to say, when g-free entered my vocabulary, for a the first few days it felt like more of a death sentence than anything else.  However, that didn't stop me from enjoying food again.  I was (and still am) determined to make my g-free recipes taste just as phenomenal as the gluten filled recipes, if not better.  My g-free conversion this week was Greek Pasta Salad.  It was mostly born from a craving for a cold summer salad (not involving green leafy veggies, cause that all too often becomes my go-to lunch) and a combination of what was in my pantry and fridge at that particular moment.  I would possibly make a few changes in the future, but here's what I came up with (hubby helped himself to several servings, so it's safe to say it was a hit).


Greek Pasta Salad

1 Package Quinoa Elbow Noodles (I'm sure rice spirals would work wonderfully for this dish)
1 Package Chopped Grape Tomatoes
1 Can Chopped Black Olives
1/2 Cup Crumbled Feta Cheese
3 Tablespoons Chopped Italian Parsley
1 to 1 1/4 Cup Greek Salad Dressing (I used Ken's - from the ingredient label it seems to be g-free, and I don't react to it, but double check it if you definitely have Celiac)
3 Tablespoons Balsamic Vinegar
Olive Oil to taste
Pinch of Sea Salt & Black Pepper (to taste)

1. Prepare noodles as package instructs. Rinse noodles under cold running water and let dry.  (My quinoa noodles need a little longer to cook than the package says, otherwise they end up a bit too firm.)
2. Prepare chopped ingredients & set aside.
3. In a large bowl, combine noodles and wet ingredients.  Fold in tomatoes, olives, cheese, parsley, salt & pepper.  
4. Cill for 1 hr if you'd like for flavors to meld.  Otherwise - enjoy!


Related Posts Plugin for WordPress, Blogger...
©Pink Peony Style - Designed by BDD