Showing posts with label melanie. Show all posts

Wednesday, August 1, 2012

Food : Elderberry Syrup & Foods That Heal


My journey to heal my body was long, discouraging, and expensive.  In trialing hundreds of medical, natural, and folklore remedies to get well, I discovered breakthroughs but many setbacks about what truly has a positive benefit to health.  One of the natural remedies I was once convinced would cure my every ache was a sweet tasting powder taken with oxygenating water drops.  No luck with that one.  I experienced points of hopeless desperation and spent a lot of time on my knees seeking God for answers. Although my healing wasn't instantaneous,  I had a peace that God would lead me to what would heal me.   Through a journey I will never forget, God showed me which foods, herbs, alternative medicine techniques, and dietary models were in alignment with what He created to be beneficial to our bodies.

    One very important thing I learned on my journey is:

The most healing foods can be made in your own kitchen.

Think of your pantry, freezer, and refrigerator as a first line of defence when sickness hits.  Make garlic tea, take a spoonful of elderberry syrup, pull some homemade stock out of the freezer for soup.  Don't have any of those staples made?  Now is your opportnity to begin turning your kitchen into a virtual medicine chest.

Here are 3 easy steps to get you started.

  
1. Homemade broth:

                           {Beef broth labeled and dated ready to be refrigerated or frozen for later use.}   

Next time you buy a rotisserie chicken, toss the meat picked carcass in the crockpot with veggie scraps and cover with water.  Cook it on low for 8-12 hours while you sleep.  The next morning strain the broth, trash the scraps and put the broth in jars to be refrigereated or frozen.  Soup can now be ready in 20 minutes once you have this step down. You can also make broth by simmering the bones and veggie scraps on the stove top as well.   During the week while I'm cooking, I save vegetable scraps in a ziplock bag just for broth making.  Examples include the tops and bottoms of carrots, celery, onions, garlic, or parsley.  You can also buy stock bones from your butcher or local grocery store.  Bones from organic fed animals such as grass-fed beef and pastured chickens will provide an even more nutrient dense broth than conventionally raised animals.

Chicken, beef, or fish broth is rich in minerals such as calcium, phosphorus, silicon, magnesium, and sulfur. It also contains trace minerals that are easy for the body to absorb. Broth also has natural gelatin and collagen which are excellent for healing inflammation in the body as well as making your skin look beautiful. The glycine in the gelatin has even been shown to help with liver function.  Store bought broth does not have the same healing effect as the homemade variety, so whip up a batch on the weekend so you can have broth throughout the week or frozen for a later use.

       
2.  Garlic Tea

  As for garlic tea, I make it any time anyone in the house gets the slightest sniffle or upper respiratory tickle.  I've been known to drink 2-3 cups a day when I feel a cold coming on or when my co-workers have all come down with something.  Surprisingly though, it does not taste like garlic: the lemon juice takes over and it tastes like lemon water with honey.  This tea is not only great for viral infections but it is also anti-bacterial, anti-fungal, detoxifying, and calms the digestive system.  Once made though, it doesn't keep for more than 2 days in the fridge.  Drink up and share with the family!  Here's an easy recipe that can be made in 20 minutes.

3. Elderberry Syrup {Recipe below}:

Elderberry syrup is great to have on hand to prevent colds, sorethroats, or any virus. It is both anti-inflammatory and an antioxidant. You can buy elderberry syrup made with honey at the local healthfood store (I won't tell), but it is much cheaper to make st home. Take one to two teaspoons at the first sign of a cold, sore throat, flu or other viral illness.  You can also take 1 tsp daily as a prevention.   This is a staple to have in your healing kitchen repertoire.   I found fresh berries at our farmers market but you can also buy them dried here. This tonic is great for kids too, provided they're not babies under one year of age.


The above ideas are easy entry level ways to begin using your kitchen as a medicine cabinet.  We can choose to heal with every morsel that crosses our lips.  It's really that simple.  Besides, your great grandmother would approve.


Elderberry Syrup


I had two cups of fresh elderberries, so I left one batch plain and added sliced fresh ginger to the second.  Either way you make it, this is one immune boosting tonic!

- 1 cup fresh or 1/2 cup dried elderberries
- 1/2 inch slice fresh ginger (optional)
- 3 cups water
- 1 cup raw local honey


  1. Heat the berries, ginger (optional) and water to a boil, then reduce to simmer for 30-45 minuets.
  2. Remove ginger.  Mash the berries, strain, and add honey. 
  3. Bottle and store.  Keeps in the refrigerator for 2-3 months.

What else can you do with Elderberry syrup besides taking it each day as a flu prevention or taking it at the onset of a cold?

  • A sorbet base
  • Ice cream topping
  • Drizzled on your pancakes
  • Add a few tablespoons to frosting for cupcakes.
  You can also make this refreshing lime and elderberry cooler!


Elderberry & Lime Cooler
Serves 1 {can be doubled, or tripled}

- 3 tsp Elderberry syrup
- 3 drops stevia {or 1 tsp honey}
- 1 tsp lime juice
- 1 cup water
- Ice Cubes

  1. Combine all ingredients in a 4 ounce tumbler, stir, and enjoy!

I'd love to hear from you!  Leave a comment below telling us what steps you have done to make your kitchen/home a healing place. 
- Melanie

This post linked with Slightly Indulgent Tuesday, Allergy Free WednesdayHearth and Soul Hop,and Keep it Real Thursdays.


- images via Melanie

Wednesday, June 20, 2012

Food : Super Greens

Hello, it's Melanie again from The Grecian Garden.  A typical scene played out in front of my refrigerator a few weeks ago, and I thought I'd share...

I got home late from work and hadn't planned out my dinner yet.  I had some left over salmon, but what to serve with it??  As I scanned the fridge a few times, I kept finding random greens and herbs.  Before I knew it, onions were being tossed in a hot skillet for a Super Greens sauté.

What's so super about the greens in this stir fry?

Arugula is actually a cruciferous vegetable and is in the same family as broccoli.  It is often called "rocket" and is an antioxidant and mineral power house.  Argugula's phytonutrient content may help prevent against certain cancers(1).

Watercress has been found in scientific studies to reduce DNS damage caused by free radicals(2). Jay Kordich says to juice watercress to help keep the lungs strong.  Watercress, also in the cruciferous family has a vitamin and mineral content that would put to shame any multivitamin on the grocery store shelves.  

Beet Greens, similar to most other greens, contain vitamins and minerals for strong, healthy bones.  Beet greens also have the amino acid tryptophan, which can be used by the body to create the neurotransmitter seratonin, which helps to regulate mood and sleep cycles.  Balanced mood and better sleep?  Bring on the beet greens!!


Beet Green Sauté

This side-dish comes together quickly and will round out any meal.  Don't like a strong "green" taste?  Don't skip the lemon juice.  It will make those greens addicting to the pickiest of eaters.

- 6 oz Fresh Arugula or Spinach {or combine the two}
- 1 Bunch Watercress
- 1 Bunch Beet Green {I used the beet green from three beets}
- 1/2 of a Large Onion
- 3 Garlic Cloves
- 1/2 in Piece of Ginger Root {optional}
- Salt & Pepper, to taste
- 2 t Fresh Dill, chopped
- 1/2 a Lemon
- Sesame Oil {unrefined}, for cooking
- Sesame Oil {toasted}, for drizzling
  1. While your 10" skillet is preheating to a medium heat, chop your onion, slice your garlic and grate your ginger.  Add 2 T unrefined sesame oil to skillet and toss in the onions garlic and ginger.  Stir often to prevent burning.
  2. Chop watercress and beet greens.  Toss into hot skillet with arugula or spinach and season with salt and pepper.
  3. Stir until greens are tender, about 3 minutes.
  4. Remove from heat and stir in fresh dill and sprinkle with lemon juice.
  5. Drizzle with toasted sesame oil just before serving.
I hope you enjoyed this recipe!  Check back for more healthy and inspiring recipes soon.

-Melanie


* 1 | 2
-image via Melanie

Wednesday, June 6, 2012

Food : Parsnip Fries


Hi friends, Melanie from The Grecian Garden, bringing you a fresh new recipe.

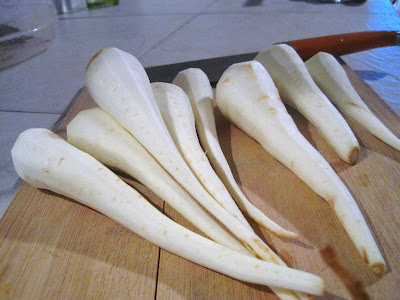
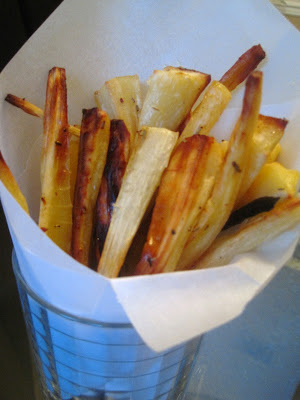
On busy weeknights I, like you, need side dishes that are quick to prepare and won't chain me to the oven for a stir-a-thon.  Enter parsnip fries on the scene.  After peeling and a quick chop, I toss them in the oven, giving me 20 minutes to create the rest of my dinner.  


I'm constantly on the look out for a substitute for white potatoes.  I grew up eating the creamiest, mashed potatoes, this side of the Mississippi, on a weekly basis.  But it wasn't the creamy spuds that stole my heart.  It was the baked Greek fries that I couldn't get enough of.  Long gone are the days of stuffing myself with white potatoes, as they always seem to throw my tummy for a tizzy.  These days, I choose my carbs wisely - carbs that make me feel good.


Parsnips have a slight licorice flavor and paired with herbs such as rosemary or marjoram, they really come to life.  I hope you enjoy this quick weeknight side as much as we do.


Parsnip Fries

The thinner you make these, the crispier they will be.  I make mine more like steak fries to get the crispy exterior and the creamy interior.

- 1 lb of Parsnips
- 3 T Oil, plus extra for greasing {I prefer coconut, but olive oil will do.}
- 1 t Salt
- Pepper, to taste
- 1 T Freshly chopped Rosemary or Marjoram {or 1 tsp dried}
- Half a Lemon
  1. Preheat oven to 425 degrees.  Line a cookie sheet with parchment paper and lightly coat with oil of choice.
  2. Wash, peel and trim parsnips.  Cut into sticks as thick or think as you like.  Place onto cookie shed, coat with oil and sprinkle with salt, pepper, and rosemary.
  3. Roast for 20 minutes, turning half way through cooking.
  4. Sprinkle with half lemon just before serving.

I hope you enjoyed this recipe.  Be sure to check back soon for another yummy recipe!

- Melanie

- images via Melanie

Wednesday, May 30, 2012

Food : Quinoa Stuffed Zucchini Blossoms

Hi!

Melanie here.  I am so excited to join such a wonderful team, here at Pink Peony Style, created by my great friend Danya.  Danya and I share a love of good food that just so happens to be gluten free.  I enjoy making food that tastes so good, you or your family will never guess that it's gluten free {and healthy!}.  My favorite things to create in the kitchen are classic Greek dishes with my now healthy, g-free twist.  I'm thrilled to share my best recipes with you and I look forward to connecting with you here, on my blog, Facebook or twitter.  

Okay, enough about me.  Here's a recipe so intriguing, it really doesn't need an introduction. {Although it does involve eating flowers.}

Have you ever eaten flowers?  No, I'm not talking about those edible ones you buy at the grocery store in plastic containers.  I'm talking, strolling through your backyard {or your neighbors!} and being drawn in by such beauty that you had to take a nibble.  I can remember picking little yellow flowers in our backyard as a child and one day, the thought came to mind to taste the tiny yellow beauties.  I had never tasted something so bright and lemony!  We often think of flowers as being great additions to face and body potions, so why not share the love with our taste buds?  


Kolokythanthoi Yemistoi, or stuffed squash blossoms as they are called in Greece, is a traditional Greek appetizer usually stuffed with a combination of ground meat, herbs, and minced vegetables.  Both my husband and my father remember their Greek mothers gathering and stuffing squash blossoms from their gardens and filling them with a hearty meat filling.  

Last week, when I picked my squash blossoms, I didn't have any ground meat to make the traditional filling.  However, I did have some leftover quinoa in the fridge, so my recipe making wheels started to spin!  I soaked my zucchini blossoms and began to create the filling {which came together rather quickly since the quinoa was already cooked.}


Once I had my filling made, I began to stuff the blossoms. Since I had soaked them in water already, they were quite tender and easy to fill.  I simply laid them out, and one flower at a time, I gently lifted a petal and snipped the pistil or stamen from the inside.  Then I stuffed the bases with a small amount of filling and set them in a glass dish until I had finished stuffing the others.


Now that they were stuffed, they were ready to cook.  In less than 10 minutes I had the most delicate, savory appetizer.  I seared them for a few minutes in coconut oil on each side, for a total of 9 minutes.  {You could stuff them and keep them in the fridge until your guests arrive as they cook up fast.}  The flowers become tender, the filling becomes warm and each bite welcomes you into Greek appetizer heaven.  {Adding feta cheese to them is completely necessary if you can tolerate dairy.}


Quiona Stuffed Zucchini Blossoms

No squash blossoms?  No problem.  Simply use this filling to stuff mushrooms, artichoke buttons, or place of scoop of filling onto broiled eggplant.  Don't plan on there being any leftovers - these cute little blossoms are addicting {and not just to women...my husband ate his faster than I ate mine}.

Ingredients
- 18 Squash Blossoms {or whatever you plan to stuff}
- 1/2 Onion, chopped
- 1 Carrot, peeled & chopped
- 1 Stalk of Celery, chopped
- 3 Mini Sweet Red Peppers {or 1/2 of a large red bell pepper, chopped}
- 1 Cup Spinach, Arugula or other quick cooking green {optional}
- 3 Cloves of Garlic, minced
- 1/2 C Quinoa, cooked
- 2 T Fresh Dill, chopped
- 1/4 C Cranberries, finely chopped
- Salt & Pepper {to taste}
- 1/2 Lemon
- Coconut Oil
  1. Combine onion, carrot, celery, red peppers, spinach, garlic, quinoa, dill, cranberries, salt, pepper and lemon juice into a bowl.  Mix until blended.
  2. Lay one squash blossom flat on a napkin and while gently opening one petal while stuff 1/2-2 teaspoons of filling into each blossom.  Be careful not to over-stuff.  Twist top of flower blossom and lay in a dish until all blousoms are filled.
  3. Heat a 10 in skillet to medium heat and add 1 T coconut oil.  Reuce heat slightly and add stuffed squash blossoms 8-9 at a time.  
  4. Cook blossoms a few minutes on each side, turning every few minutes to cook all sides evenly.  {Mine were in the skillet for a total of 9 minutes.}  
  5. Once cooked through, place on a plate and sprinkle lightly with salt. Enjoy! 

I hope you enjoyed this recipe.  I would love to hear about your experience with making your own Quinoa Stuffed Squash Blossoms.  {Have you ever incorporated flowers into a dish?  If so, what?}

Stay tuned for more recipes and don't forget to enter the PPS giveaway.

- Melanie


This post linked with Friday Foodie Fix.
Related Posts Plugin for WordPress, Blogger...
©Pink Peony Style - Designed by BDD