Showing posts with label baking. Show all posts

Wednesday, September 12, 2012

Food : All Things Pumpkin

I don't know about you, but I'm a fanatic about all things pumpkin!  Of course, along with everyone else, I'm thrilled about the return of the great Pumpkin Spice Latte, but I'm also excited about all of the pumpkin possibilities in the kitchen!

Pancakes, biscotti, ravioli, cookies - the possibilities are endless.  Pumpkin can go into just about anything.

I'm still working on trying my hand at my own gfree pumpkin creations, but I thought I'd inspire you via my internet pumpkin finds!


1 | 2 | 3 | 4 | 5 | 6
Are you salivating yet?  I am.

Fall is on it's way and I'm excited!

Are you a pumpkin fan?  If so, what's your favorite pumpkin laced recipe??


XO

Wednesday, August 29, 2012

Food : Cherry, Almond & White Chocolate Quinoa Cookies

Good morning PPS readers!

Danya asked me to do a guest post for her this week and I was absolutely thrilled! I am the Mrs. over at Desiring Providence, where I blog about family life, food, and adventures.You are welcome to check it out if you have the time!

I am passionate about kitchen creations, and have a special treat to share with you today.

After I gave birth to our son, I needed snacks on hand that would satisfy my hunger and provide a boost of energy for those nighttime feedings. These cookies came to mind and were the perfect addiction to my night time routine, providing important nutrients and a complete protein source, important for a healing body. The quinoa makes these cookies soft and chewy and adds a unique nutty flavor, while the cherries and white chocolate chips add a bit of sweet.

The best part about these cookies is they are really very versatile. Try mixing and matching with different nuts, dried fruits, and additions such as chocolate chips. Have fun with it and create to your heart's content (or your stomach's, for that matter!).


Cherry, Almond, White Chocolate Quinoa Cookies
Adapted from Krug the Thinker


- 1 1/2 cups wheat flour {A blend of coconut, rice flour & arrowroot powder could be substituted for my gfree friends}
- 1 tsp salt
- 1/2 tsp baking powder
- 1/2 tsp baking soda
- 1/2 cup unsalted butter at room temperature
- 1/4 cup of sugar
- 1/4 cup brown sugar
- 1/4 cup honey
- 2 eggs
- 1 1/2 tsp vanilla
- 1 cup cooked and cooled quinoa
- 1 cup old fashioned oats
- 1 cup dried cherries
- 1/2 cup chopped roasted almonds


  1. Preheat oven to 375 degrees. 
  2. Combine flour, salt, baking powder and baking soda in a separate bowl. Beat together butter, sugars, and honey until fluffy. 
  3. Add eggs, one at a time, and vanilla until batter is once again light and fluffy. Slowly beat in flour mixture. Stir in quinoa, oats, cherries, almonds and chocolate chips.
  4. Drop by rounded tablespoons onto parchment lined baking sheets. Bake for 13-15 minutes until golden brown in color. 
  5. Transfer to a rack to cool. 

Cookies can be stored for one week in an airtight container. They may also be frozen for portion controlled snacking! Just thaw desired number of cookies at room temperature and enjoy.

What kind of ingredients would you mix into these cookies?  Would love to hear.

Hope to see you over at Desiring Providence sometime!

Thursday, June 28, 2012

Food : How To Fill & Frost A Cake


Last summer my mom and her sisters thought it would be fun to take a cake decorating class with their daughters.  So us girls pulled out our aprons, purchased our cake decorating kits and committed several week nights to honing our skills.

I'm by no means a pro, but I certainly learned a thing or two {or ten!} and I was reminded last weekend that practice makes perfect {hubby's birthday cake}.  While I was decorating, I thought it would be fun to do a post on filling and frosting a cake.  That was one of the most valuable things I learned last summer.   So here goes....  {Feel free to comment with questions if you have any. I'll do my best to answer.}

Baking
For hubby's bday cake I made a 6 inch gluten free chocolate cake and filled it with a raspberry filling and topped it with a homemade cream cheese frosting.  {you're salivating right?! I thought so. :)}  

The 6 inch cake pan is my absolute favorite!  Not only is it adorable and totally perfect for gifting a friend, but it's an easy and not so intimidating size to work with while learning to fill.  A 6 inch pan is a bit difficult to find in stores, so I ordered mine from amazon. {here}  When baking with a 6 inch pan, bake it at 325 degrees for 1 hour and 25 minutes.  {Be sure that your oven is at a legitimate 325 before inserting the cake and as tempting as it is to open the oven - don't touch that door! Let it completely bake for the required baking time.  This ensures you have a nice, fluffy cake every time.}

Use whatever size cake pan you'd like, I recommend something round for your first go at it.  Make your cake according to your recipe {I used a Duncan Hines Gfree Devils Cake box mix since I haven't found a great gluten free cake flour blend yet, and I doctored it up with a handful of semi sweet chocolate chips.}, thoroughly grease and flour your pan. {I use crisco - I know, gross.  But it's the best for guaranteeing your cake will completely come out of the pan.  I "flour" my pan with a thick layer of cocoa powder when baking a chocolate cake. I've used arrowroot powder or rice flour for a white cake.}  When baking time is up, remove from oven, transfer to a wire cooling rack and let cool completely.  I've learned the hard way to plan ahead.  There's nothing worse than spending lots of time and energy {and love} on a cake and then being rushed to decorate it and it's either a melty mess, lop sided, or sloppy.  I try to bake my cake the day before I need it.  

Filling
For my filling I used half a jar of store bought raspberry preserves with seeds {they look so pretty and fruity}.  You can use jam, preserves or even frosting - fruit preserves are usually my filling of choice.  

To make your filling use your preserve of choice + 1 tablespoon of butter.  Melt in a sauce pan over low heat, stir constantly.  Once it's a nice consistency, remove from heat and set aside.


Frosting
Make your frosting.  My absolute favorite frosting is a classic cream cheese frosting.  Crisco based frosting is disgusting {in my opinion} but is amazing for decorating with, so I will occasionally make a batch of this for details such as flowers, but I usually douse my cakes in a nice, thick layer of cream cheese frosting.  Here's my go to recipe:

1 8 oz Package Cream Cheese, Room Temp
1/2 C Salted Sweet Cream Butter, Softened
2 C Powdered Sugar 
1 t Vanilla {be sure to use clear vanilla if you want a pure white cake}

Combine in a mixer and mix until smooth.  

With a spatula, fill a piping bag with your frosting and set aside till ready to use.  

I have a featherweight cake decorating bag and decorating tips that I use for frosting.  If you don't have those, a large plastic ziploc will do the job.  Fill the bag, snip a corner tip off {not too much} and twist the top of the bag.


Cutting
If you only baked one cake and wish to cut into two halves so that you can fill it, you must cut the cake evenly.  This can be tricky.  Once again your cake must be completely cooled.  I have this nifty little cake slicer that gives me an even cut every time {and can be used to shave off the top of my cake if it's rounded}.  A large, sharp knife may be used as well, it's just a little more difficult to get an even slice.  

Cut your cake into two {unless you baked two cakes - if that's the case, even the tops and make them flat}.  Use your most even side for the top of the cake {if you can't get an even cut, turn the cake upside down and use the bottom side, this will be your top piece}.   

Assemble
Ok now we're ready to fill & frost!


The trick to getting your filling to stay in the center of your cake and not ooze all over the sides or into your frosting is to create a barrier with your frosting first.  {I forgot this step as you can see in this pic.  I was so excited to get that filling on that I completely skipped this step.  Thank goodness I remembered and had plenty of room on the sides to correct my mistake.  


Move the bottom half of your cake to the cake stand or plate you wish to serve it on.  {You can see in a pic below that my cake stand is sitting on top of another white rotating cake stand.  This is similar to a lazy suzan (which would work perfectly if you have one lying around), and is used to turn your cake easily while decorating.  Or you may purchase one here.}  

With your bag of frosting, frost the edge of the cake with at least two layers of frosting.  {This is still a necessary step if you're filling your cake with frosting.}


Next, spoon desired amount of filling onto center and spread with a spatula.


Now carefully place your top half of cake on top.


With your piping bag, pipe frosting onto the top and sides of the cake and smooth with a flat spatula.  Let sit before decorating.  The frosting will "dry" {or somewhat harden} if you allow it to sit and will be much easier to decorate.  

A handy little tip for achieving a flat surface is let your cake "dry" and then with parchment or wax paper, lay on top and gently smooth with a light rolling pin or flat spatula.  If your frosting cracks, gently smooth it out and let it dry again.  


Viola!  You have a beautifully filled and frosted cake ready for decorating!  Mine's not perfect, but like I said practice makes perfect.  


I hope this was helpful to you!  Happy frosting!!


- all images via danya collyer. 
Please do not use without permission.

Friday, December 16, 2011

Christmas, moving, and other things...

Wow, the days are slipping away.  Christmas is on our heels and our big move is just around the corner!  I'm done working and taking the time off to prepare for the cross-country move.  All is falling into place except for one (in my opinion) MAJOR thing - housing.  :-\  So many people ask if we're excited and what not, yes, of course we are - it's an adventure....but there's that homemaker thing inside me that's just itching to find a cute little (affordable) place to call our own.  Having a pup in tow isn't exactly making the matter any less difficult.  He's a great little guy, but convincing a home owner that I may just have the best doggie in the world is an entirely different story.  Humph!  What to do?  What to do?  Trust God.  It's all I can do.  He's provided everything else thus far, I'm sure that's on it's way.  The planner in me just wants to know exactly where I'm headed and what I'm doing.

Since my last post some of my precious students participated in my Christmas recital.  Oh my goodness, it was the sweetest thing!  Each student played (piano, guitar, or sang) two Christmas songs; I truly couldn't have been more proud.  I was a little nervous there for a few kiddos, but they all got through their songs and they did such a fabulous job!  Here's a photo one of the mom's snapped:  (Don't they look precious in all of their pretty dresses?  Some of them even doused themselves in glitter for the event!  Oh girls! ;)


In other news, lots of baking has been going down in the Collyer kitchen.  Last night was a pinterest inspired bake-a-thon with gfree Deep Dark Chocolate Cookies & a Tiramisu Roulade.  Ummm, sugar overload?  I think yes!  My kitchen is still doused in powdered sugar - Blakely's enjoying the new sweet flavor the tile has acquired.


You can find the recipe to the cookies here and the roulade here.  (A little tip if you plan to try the roulade - I actually added chocolate chips to the layer of marscapone cheese for a little added sweetness since there wasn't any sweetener in the cream...it turned out perfect!)  The cookies are for our neighbors and the roulade was for hubby's work Christmas party.

And lastly before I turn in for the evening....we had a friend take a few Christmas pics & thought I'd share.  Hope you're enjoying the holidays!  If I don't make it back to PPS before Christmas (cause this whole moving thing is just consuming me), MERRY CHRISTMAS!

Lots of love....


Wednesday, November 9, 2011

2 Years of Love & A Bright Future...

It's been a busy couple of weeks and my posting has become sporadic, but believe me when I tell you that lots of fun and exciting things are happening here in my household.

Yesterday hubby and I celebrated 2 whole years of marriage - TWO years!  I cannot believe how fast time has passed.  These truly have been the most amazing two years of my little life.  My husband is beyond amazing and our future is bright - we're looking forward to what's ahead.  To celebrate, last night we had date night at home with homemade Lemon Thyme Roasted Chicken and Potatoes and yummy homemade Chocolate Mousse with Strawberries.  I got hubby a wii (he's been wanting one for a while) and he wrote me beautiful vows (since we didn't write our own for our wedding), and gave me beautiful flowers and a ticket to the December Beth Moore conference.  I'd say it was a pretty special evening.  :)

Here are a few photos from our wedding.  Jeremy and Hara Cook from Cook Images were our photographers - they did an amazing job.  It truly was the most beautiful day of my life...take a look.


So speaking of the future - we have some news to share.  Are you ready for this??  This southern belle is packing her house (with yorkie in tow) and moving to Monterey, California!  It feels as if it's all happened so fast, I'm still trying to catch my breath, but it's an exciting season for sure.  Hubby has been offered a Creative Arts position at Calvary Montery and we couldn't be more thrilled.  I'm especially looking forward to exploring a new place, enjoying the great outdoors a bit more and making new friends.  And while I'm excited, I do have to say that it's all a bit bittersweet.  Family, friends and this little beach town are all so close to my heart, I know homesickness is on the horizon.  I'm sure you'll be seeing a lot more posts once we get settled into our new home come January 2012 - I'll need something aside from what I miss to distract me in those first few months.    

I'm thrilled we'll be home to celebrate the holidays one last time, I'm trying to soak up every moment of it.  I know it will be over before we know it.  However, if anyone has any advice on moving cross country (pods vs moving van, shipping car companies, where to find boxes, etc.) I would LOVE to know.  I'm a newbie at long distance moving.  

To celebrate our happy 2 years and to take a few days together before the packing/holiday madness begins, we're skipping town and road tripping it to either New Orleans or Atlanta this weekend - we'll decide tonight.  Thanks for all of the Happy Anniversary wishes we received yesterday & thanks for all of the support friends and family have given to our big change.  Looking forward to what's ahead.

Lots of love....

Thursday, October 13, 2011

Apple Cobbler

Hallelujah - we have ac again!  In Florida, you can NEVER take your working ac unit for granted.  Sure, it racks up the power bill, but oh my goodness, it keeps this girl in a good mood.

What a crazy week it's been.  Hubby and I are preparing to head to Monterey, California (yay!) Sat to lead worship for a church on Sun.  We're so looking forward to being on the West Coast, taking in "mountains" & ocean (anything larger than a sand dune is a mountain to me :), breathing in the fresh air and scoping out the fun local places.  Any suggestions as to what we should do/see while we're there?

As I mentioned a few posts ago, my sister was recently in town and as usual, her visit was far too short.  For her last night home we made a big g-free dinner - it was delish!  We made one of my new favorite meals from a recent Martha Stewart magazine, Braised Chicken with Potatoes, Olives & Lemon, and it's naturally g-free (& oh so beautiful)! (The only substitution I make is swapping out the cornstarch for arrowroot pwdr.)  It was a hit.  To wash down the chicken, we had Apple Cobbler & topped it with vanilla ice cream - can you say yummy??  You can bet this Apple Cobbler will be making a Thanksgiving appearance.  It was so fantastic, I decided to share.  Would love to hear your thoughts, if you give it a try.


Gluten Free Apple Cobbler


Filling
5-6 Green Apples, peeled & sliced
3/4 Cup White Sugar
2 T Brown Sugar
1/4 Cup Almond Flour
1 t Cinnamon
1/2 t Nutmeg
1 t Vanilla Extract
1/4 Cup Hot Water
2 T Butter, Softened

Topping
1/2 Cup Almond Flour
1/2 Cup Arrowroot Powder
1/4 Cup White Sugar
1/4 Cup Brown Sugar
1/4 t Salt
2 T Butter, Softened
1 Egg

Directions
Serves 6

  1. Preheat oven to 350.
  2. In a large bowl, combine all filling ingredients, leaving out the butter.  Toss gently and pour into a lightly greased square baking dish.
  3. With a teaspoon, spoon softened butter in several rows on top of filling.
  4. Combine topping ingredients and mix until batter is smooth.  Drop batter on top of filling in spoonfulls, evenly (I like to use an ice cream scoop).
  5. Bake for 35 minutes or until top is golden and filling is bubbly.
  6. Serve with vanilla ice cream or whipped topping.

{Prepared and ready to bake}


{Baked to crispy, flakey, gooey-apple perfection!}


{I'm pretty sure it's safe to say we licked the dish clean}


Okay, I'm off to do some packing & sneak in a few bites of the sushi my hubby just walked in with!  Lots of love...


Wednesday, September 21, 2011

GF Stuffed Mushrooms

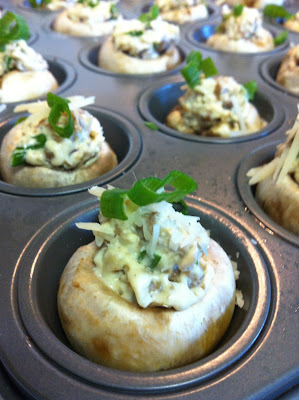
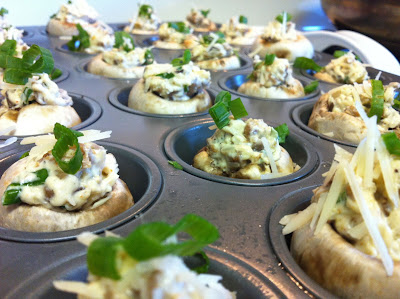
I can't believe it's already Wednesday!  Oh how the days fly.  We celebrated my cousin's 30th birthday on Saturday and of course, I had to find a simple yet fabulous gf recipe to share.  For some reason stuffed mushrooms were on the brain, but I have yet to make them without bread crumbs.  By now, you know I love a challenge, so I decided to hunt for a good g-free stuffed mushroom recipe.  I found my inspiration here, but decided to make it my own.  They turned out delish if I may say so myself!  A winning party recipe for sure.  


G-Free Stuffed Mushrooms

Ingredients
24 Whole Fresh Mushrooms
2-3 T Butter, Melted
1 T Olive Oil
1 T Minced Garlic
1 (8oz) Package Cream Cheese, Softened
1/2 C Cooked Sausage Crumbles
1/2 C Shredded Parmesan Cheese (reserve a little for topping)
1/4 C Green Onion, Chopped (reserve a little for topping)
1/4 t Ground Black Pepper
1/4 t Onion Powder
1/4 t Ground Cayenne Pepper (use sparingly if you don't want to have a little kick)

Directions
  1. Preheat oven to 350 degrees F.  Melt butter and spoon a small amount into each cup of a mini muffin pan.  (A baking sheet will work, but a muffin pan holds the mushrooms perfectly, keeping all of their insides, well, inside.  If using a baking sheet, spray it with cooking spray and shave a small amount off the bottom of each mushroom, this will help to keep them stable.)  Clean mushrooms with a damp paper towel & carefully break off stems (setting stems aside in a small bowl to be chopped) & set mushroom cups upside down into the muffin pan.  Chop stems extremely fine, discarding any tough spots.
  2. Heat oil in a large skillet over medium heat.  Add garlic and chopped mushroom stems to the skillet.  Fry until mushrooms are browned.  Add cooked sausage crumbles (if not cooked, cook in a separate pan before adding to the mixture) & fry until most moisture has been absorbed.  Set aside to cool.
  3. In a small bowl, mix cream cheese, parmesan cheese, black pepper, onion powder & cayenne pepper.  Fold in chopped green onions (leaving a few behind to top your mushrooms). 
  4. Once cooled (can still be warm, just not hot), fold mushroom/sausage mixture into cream cheese mix. 
  5. Spoon mixture into a ziploc bag & trim tip off, pipe into mushrooms.  
  6. Top with remaining parmesan cheese and green onions & bake for 20 minutes, or until mushrooms are golden.
  7. Let cool & ENJOY!
*Mushrooms can be made a few days in advance and baked just before you need them.  


{Clean & remove Stems}

{Melt Butter & Spoon into Muffin Tin}


{Place Mushrooms into Pan}

{Sauté garlic & chopped mushroom stems & add cooked sausage}

{Make Cream Cheese Mixture}

{Pipe into Mushroom Caps}

{Top with Parmesan Cheese & Green Onions}

{Bake till golden brown}


{Enjoy!}


Related Posts Plugin for WordPress, Blogger...
©Pink Peony Style - Designed by BDD